More disappointments!

Today when I checked on my three baby ducks, two were dead! 🙁 I don’t know what happened, other than that I fed them chopped cilantro as greens yesterday- I wonder if that is somehow toxic to them? I feed it to the big ducks all the time with no trouble, and couldn’t find any indication on the web that it’s toxic. But I did find evidence that people use it for detox measures, so maybe there was some issue there on those little bodies.

Anyway, sad to see such cute babies dead; and the one remaining one seems in distress neurologically as well as from being alone. Singleton babies are never good. I’ve given him some Nux Vomica in hopes that it addresses any toxicity, that’s all I can do! I imagine I could raise animals my whole life and always be saddened to see one perish; but I guess I would never want to see myself lose that compassion for animals either. Every loss is hard.

I’m afraid to try more incubation (though I’m going to have to get back in the saddle sometime and figure out how to do it); and I don’t have enough eggs coming in to make it worthwhile now anyway. So, I’m thinking of ordering a batch; as I really want to increase my flock to around a dozen birds.

I’ve been tempted by Metzer Farms’ “Golden 300 Hybrid” that is specially selected for superior egg production. But… their colors aren’t the best. I must admit, despite all the utilitarian reasons I keep them, I also like them to look nice!

I think I may stick with the Runner and Magpie breeds, though neither have been laying for me as well as the books say. I don’t prefer Khaki Campbells as much (the other good laying breed), I don’t like their color and they are known to be excitable (and my mom’s Khaki mixes certainly are!)

I may mix in some Blue Swedish at some point to improve carcass weight and robustness; but stay generally with the black/blue/silver colors. I’ve resigned to the fact that purebreds aren’t going to work for me, as none of them is designed for all the things I want: eggs, meat, foraging and hardiness for herding (and looks!). 🙂

Disappointments

This weekend I had a couple of disappointments. 🙁 First, of my nine fertile duck eggs in the incubator, only three hatched! Those  three hatched on time, successfully, and are robust and healthy. But the other six were more full-term babies that must have perished about three days before the hatch-just before absorbing their yolks.

So, I don’t know what’s going wrong. My only guess is that with the warm summer weather, the temperature fluctuations are just too great inside the incubator. I believe that the heating element controller only has a variable resistor in it, that just determines how much power (or maybe some timing of an on/off cycle) goes to the  heating element. What would be better is a thermostatically controlled unit. I’d get it set right one day, then we’d have a hot or a cold day, and I’d notice the temp would be several degrees off in there! But, you would think that momma ducks would have the same problem nesting outside??

So, <sigh> I’m not sure what I’ll do next. It’s about $50+ to mail-order ten ducklings from a hatchery, and I’ve heard that mortality rates  are high in those too. So, it may be worth continuing to learn how to do them at home. Or, I could let mother ducks spend several months non-laying to raise their own. We’ll see. For now, I think nine total ducks may be enough. They seem to be staying safe all day while ranging free, despite the overhead raptor presence.

The second disappointment was the fourth side of fencing- it’s finished, but I didn’t stretch one side of it well enough, and it’s sort of puffy and saggy. Not only is it unattractive, I don’t think it’s as strong that way. I think I can fix it later by cutting it down the middle and tensioning each side back towards the middle, and then crimping the ends together. But, I’m going to put that off and live with it as-is for now.

But, the weekend was still good. I got a lot done, I have three cute baby ducks at least. We got a chance to go check out the local town’s festival and antique car show for a few hours today, and also had a great dinner out on Friday night. And, I am working on some interesting projects at work right now, so I don’t even mind that tomorrow is Monday! 😉

Blue Ducks

Blue Runner x Magpie ducks

I mentioned before I was wondering about the color genetics of my now two-month-old “baby” ducks. I re-read the color section in Holderread’s book (Storey’s Guide to Raising Ducks), and now I think I understand. So, I crossed a black Runner hen with a silver Magpie drake. Black x Silver always results in 100% blue offspring. So, these guys are technically “blue” ducks, and this cross will always give me this pattern.

The genetics of the black, blue, silver color crosses are as follows:
Blue x blue = 25% black, 50% blue, 25% silver
Blue x black = 50% black, 50% blue
Blue x silver  = 50% blue, 50% silver
Black x Silver = 100% blue
He doesn’t say what Silver x Silver produces, but I’m guessing 50% blue, 50% silver?

So, as subsequent generations of these blues mix with each other, or mix with the two Silver drakes I have now, I’m going to get all three colors in the future!

I wondered about their tiny black spots. The book explains that in the blue coloring (which is a dilute of black) typically some black “leaks through.” Of course, all will always have some pattern of white, since both the Magpies and Runners carry that gene.

Magpie Drakes

Here are my Magpie drakes, father and son. The son is very pretty, and I understand good markings are hard to get on Magpies. I said I’d never show my ducks, but I may change my mind about him! If only I can find out how you get them clean for the show table! I need some advice there.

I’m pleased with the crossbreeds; I wasn’t sure I was going to want crossbreeds at first. But I’m beginning to reflect that pure Runners are too delicate for dog work; and the Magpies are too heavy and slow. The cross makes an agile duck that’s still robust enough to resist injury. I’m also having better luck with the viability of the eggs-both times, I’ve had more crossbred eggs survive than the purebred Magpie eggs. Hybrid vigor?

Hatching Time

Here is an update on my ducks. First, the bad news. My black Runner duck hen died. 🙁 I was trying to separate them into different pens before dark, she split off on her own, got scared and hid in the blackberry vines. When it gets dark, they won’t come out and put themselves away in their pens like they do before dusk.
 
I feared that if I left her all night something would get her, so I risked using the dogs to help me find her. Well, Maggie found her, and bit her quick in the neck, and she died instantly. So, lesson learned, letting the dogs hunt for singleton ducks in the dark is a bad idea (it worked once before though!). I’m sad to lose her, she was a nice looking duck and a good layer. So, of my last summer’s investment in purebed show ducks, both Runners are gone, but both Magpies have persisted.
 
The good news is that I have nine fertile eggs in the incubator due today-2 Magpies and 7 half-breeds. Two have already hatched, and I’m hoping the rest will come through OK. The first two seemed to have a much easier time than the last batch, so I think my improved setup and extra humidity is helping.
 
Here is the broken-open egg of duck #1, you can see he made a textbook exit, and a day early to boot. The next photo shows him newly hatched and tired, all flopped out on the bottom of the incubator.
Perfect exit from the shell
 
This first little guy was lonely last night, it’s amazing how strong their instinct is to want to be with a group, or somebody. In desperation, he was jumping at the sides of the hatching pen to get closer to me! He kept issuing distress calls, and I worried about him experiencing that much stress all night, since his next of kin wouldn’t be arriving until the next day. So, I gave him a little stuffed animal, and that worked, he snuggled up to it and relaxed.
Hatchling
 
Here is my new hatcher setup. Last time, I used a wire dog crate, with cardboard lining the interior walls. That worked well, except that the small tray at the bottom couldn’t handle the water load of them spilling so much, and it eventually leaked on the floor (that was a mess!). So, I’ve changed to a livestock water trough with chicken wire on the top (and this is shut in a bedroom where dogs and cats can’t go!).
Hatcher.
Here are a few more incubation details. Though I’ve now added an electric egg turner to the device, you take it out the last three days, to allow the chicks to orient themselves for hatching. So, here is what the incubator looks like with the screen floor back in, and lots of sponge pieces to evaporate and add extra humidity. I’ve also been misting the eggs daily with water.

And, here are a couple of pictures of egg candling. I found that I don’t need a fancy device, just a strong flashlight, and cupping my hand in a “C” shape between the light and the egg does the trick. First, an infertile egg: you can see the yellow yolk in there, and no blood vessels at all– this one never started growing.

Infertile duck egg
 This next photo shows a fertile egg on day 26- the egg is completely dark, full of duckling, except for the air pocket at the top, which has grown quite large.Fertile duck egg.
This  time, I wrote (in pencil) on the eggs their laying date, so I could keep track of the viability of older eggs (some were kept two weeks in my pantry before incubating). That is working well, except I see now I should write on the end of the egg opposite to the air cell, because when they crack out, they are obscuring my writing!
 
This time too, when I set them for their last three days, I marked all the “tops” of the eggs with an “X.” I’ve found that when the first few start to hatch, they thrash around in there and roll the other eggs around. I suspect flipping some of them a day before they hatch may mess them up, so this time, I’m trying to put them back right-side-up if I notice they’ve been disturbed.

Last Weekend’s Progress

Last weekend did prove fruitful for me, despite taking the break to host a family gathering, and all of us staying up late Saturday night around the campfire. Here’s the picnic table chore done:

 picnic table

I had some struggles with the Millstead kit missing some of the lumber, went back to Home Depot to get replacements, only to find the next kit we opened was also defective. So, they gave me a 2×2 and I cut my own mitered angles at home, which was annoying, since the whole point of a kit is to not have the hassle of getting out your saw and measuring things! Oh well, it still went together quickly enough to be ready for use the same day, I’m sure much more quickly than if I had built it from scratch, judging by how long the duck tractor took me. Kirk did the sanding and finishing, it turned out nice! We are enjoying eating on it in the nice weather we’ve been having.

I also got a whole line of fence posts done over the weekend, and finished up the H-braces during the week. So, that side of fence is ready to stretch-that’s Saturday’s task.

The baby ducks are growing, they are almost 4 weeks old. They have very “tweenie” feathers, and their markings continue to hold my interest, wondering how they’ll turn out! This isn’t a very good picture, it was getting dark when I took it…

Baby ducks 4 weeks old

Duck Incubation Plan: Rev B

I put more duck eggs in the new-and-improved incubator tonight. I spent the money to add the egg turner and fan options to my “stock” incubator. Now I think I’m invested over $100 in the thing! I have to make a lot of babies to pay for that! Here is tonight’s load, only 14 eggs over 2 weeks from 2 ducks (well, I broke one more):

Duck eggs in incubator.

Since I had such a poor hatch rate the first time, I’m stepping up with the added incubator features. I thought hand-turning was a pain, so the electric turner is a welcome convenience. The product’s literature warns that it’s not for duck eggs, which are large. But I gambled, and am finding they seem to fit fine, turn fine, and are not too close to the heating element. It might be a problem if it were full, however, they didn’t fit so well when I tried setting them next to each other.

The fan option is supposed to more evenly distribute the heat across all the eggs. This time, I’ll also be more careful about humidity, especially the last several days before the hatch. I plan to include wet sponges to supplement the water channels in the bottom of the foam box.

My reasons for incubating are twofold. First, I want to keep the hens laying- if they collect eggs for two weeks, set for four, then supervise babies for another month or two, that occupies them through peak laying season. Their job is partly to generate dog food ingredients to earn their keep, so I want them to keep laying. I have also decided that incubation and indoor-rearing make tame ducklings, which is much preferable to me. They are easier to manage and  handle, and more practical for their second job, which is being the subject of the dogs working on their herding skills. When I pet-sit my mom’s ducks, they are nearly suicidal when I approach them, crashing into the barn walls; and they are impossible to catch once they get loose in a panic.

The third job of the ducks has nothing to do with incubation, and that is to eat slugs! I am fairly afraid of slugs, that’s my one phobia, so I am thrilled that the ducks are so happy to eat them! It grosses me out to watch, however, as they struggle with a huge slime drool for quite a while after wolfing one down. So here’s hoping I’ll have 14 more slug eaters 28 days from now!

Duck Tractor Done

I finished the “duck tractor” (ala “chicken tractor”) last weekend– start-to-finish, including two shopping trips, over Saturday & Sunday. Ok, I need to do a little more trim-out still, it needs a ridge cap on the roof, and needs more staples on the chicken wire. But, it’s habitable, at least, so the ducks were able to “move out” on Sunday night! Phew! Here they are, settling into their new digs; read on for info on how I came up with this rig.

Baby ducklings inside their new tractor.

I’m fairly proud of my tractor design, I made it from scratch, and I think it looks pretty classy with a decidedly “northwest” architectural style! 🙂 I browsed the Web quite a bit looking for ideas, most of which are “chicken tractors”, not too many published ideas for ducks out there. I found a lot of nice ideas, but few people disclose their design details (lots of plans for sale, though). Here is a nice collection of chicken tractor photos compiled by the City Chicken website.

I needed to vary some from all the examples I saw. For one, I didn’t need to build nest boxes or perches, like one would need for chickens. Our weather is mild, and ducks are hardy, so they don’t need a plywood “house.” And two, I want to be able to walk inside the thing, to catch ducks, pick up eggs (which ducks often lay in random places), clean out, etc. Most of the designs I saw were only 4 feet high and 3-4 feet wide. If I had to crawl in there to grab a duck or a feed pan, I think my butt would get stuck! 😮

Yet, I appreciated the A-frame design of many I saw. A-frames use less lumber, arch designs are stronger and need less bracing than a “cube”, and the poultry don’t need headroom above a couple of feet. I also liked the whole “tractor” idea of making the structure move-able, with built-in handles and/or wheels. Since the farm is still in-planning, it’ll be nice to move the poultry houses around on a whim. They key is to make the tractor light enough to carry, but heavy enough that predators can’t slip under the bottom and wind won’t easily move it. So, that was my mission.

A-frames offer a mathematical challenge: that of calculating the dimensions of the sides and the corner angles. I wanted to maximize use of lumber, make it tall enough to walk in, but not so huge that it would be hard to move. Though I’m sure I calculated thousands of triangle dimensions in college, I’m sad to admit, I’d need a refresher to do trigonometry by hand now. So, I cheated, I used this handy online tool. I played around with the numbers, I knew I wanted the center peak to be about 6′ high, and I preferred the width to be around 4′ so it wouldn’t be unweildy (and so I could cut 8′ boards in half for that side). I wanted to render whole-number angles that I could set on my miter saw and which were easy to measure length-wise. What I came up with was an angle combination of 19° and 71°- not the most convenient measurements, yet I was able to make it work. It did make my brain hurt a little! 🙂

The most annoying part was that my miter saw only cuts angles up to 45°. So, to get those 71° jobbers, I had to set the saw to 19°, and butt the board up end-wise onto the saw. I imagine this probably violates safety advice for use of the saw or something. And it’s not real accurate, since the edge of the board doesn’t give enough contact with the back fence to ensure perpendicular alignment, and it’s hard to make sure the board doesn’t move. There is probably a much better way to do this, but it worked well enough for a duck pen, I just wouldn’t recommend this for finely-built custom cabinetry, by any means! Here is the start of the pen framework:

Bones of the tractor.

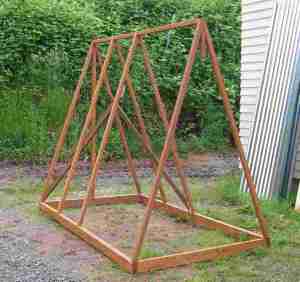
The pen is 8′ deep, 6′ tall, and 4′ wide, roughly. It’s exactly big enough for me to walk in (Kirk has to stoop). I made the rectangle floor from 2×4’s, then built up from there, making the ridge peak and diagonal sides from 2×2’s, threw in a couple of 1x4s for diagonal braces, screwing everything together, and then… the door. That part took me the longest, by far. You see, the pen is so narrow, I could not center a rectangular human-sized door, I had to use as much of the triangle as possible so I could fit through it. Yet, since I wanted it to hinge, and not slam shut when I let the door go, the hinges had to have a vertical side. Some people make these doors hinge from the bottom, flap-style, but I didn’t want to have to step over or onto a door laying on the ground. It occurs to me now that it might have been easier to make the door on a side panel, but I was fixated on making a “front” door at the time. So, here is what I came up with, this funky 5-sided door. Cutting the angles, and then assembling it was a bear, and then of course when I hung it, it sagged and bound with the frame, as doors and gates always like to do. Fortunately, a steep diagonal brace sorted that out (I wasn’t sure it would work at such a steep angle, but it did). Now it opens and closes flawlessly, with room to spare for swelling in wet weather.

Duck tractor frame with door & back wall.

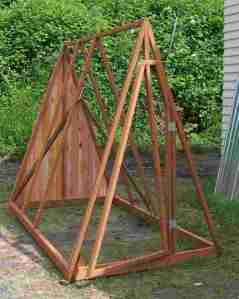
I covered the front half with chicken wire, and the back half with corregated metal roofing screwed right into the braces-no heavy plywood required. The back wall is made of thin vertical cedar fence boards, so that the ducks will have a reasonable wind screen in the back. It has no floor, because the idea is for the poultry to eat the grass they’re on, and it’s easier to pick up and move that way, no bedding to scoop out first. I used treated lumber, along with the cedar, because I didn’t want to have to paint anything; I like the look of raw materials. The whole project cost just under $200, not too bad! Here are the fruits of the weekend’s labor:

 Finished product with roofing & chicken wire screen.

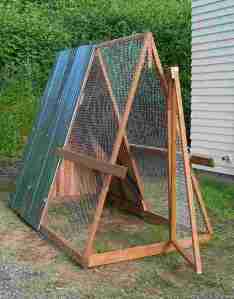
Kirk helped me move it, and it was pretty easy– the weight is perfect, light enough to move, heavy enough to sit still. The handles sticking out of the front make it slick for carrying travois-style, but I have to make a better handle for the back. For now, Kirk lifted it from the bottom, but that’s hard on the fingers, and will be dirty too. Maybe I’ll add wheels to the back.

The ducklings will need their heat lamp for several more weeks, that was easy to clamp onto the interior structure. They were pretty nervous in their new environment for a few minutes, the daddy duck strutted outside threateningly, and the collies immediately race-tracked around it. Despite all that scary stuff, the babies settled in soon and started enjoying the clover, tackled emptying the water tower with vigor, then snuggled under the lamp for the night. Then I had to clean up the mess in their cage upstairs, oh boy, shovels full of shavings soaked with about 10 gallons of water. Two weeks in the house is too long, I think!

Growing Like Weeds

The ducklings aren’t quite two weeks old yet, but they are growing like weeds! Here they are today:

They are still in the house, but MUST go outside this weekend. They are going through way too much water (2 gallons per day), most of which goes on the floor of their cage. I hoped to build their outdoor “duck tractor” last weekend, but didn’t get to it; so it’s top priority for Saturday!

I am pleased with how tame they are turning out, being incubator babies and being handled a lot from being in the house. Though they still shy from hands, they don’t completely panic when picked up. So they’ll be nice for working with later.

Duck Breeding Pondering

I wish I could find more information about duck color genetics that pertain to the breeds I have, Magpies and Runners. My reference book has a lot of info on other breeds, but not these. Here are the two Silver Magpies, the drake is the one with more color on his back:


Can you see how they are kind of grubby? I am vexed by this, when I bought  them last summer at the county fair poultry show, they were perfectly white and pristine. Now, not only are they stained, but their wing and tail features are scrappy. I work hard to keep their pen clean (as clean as possible given that they are ducks and enjoy making everything muddy). I tried switching their food. My next guess is that they need their own duck-sized bathtub, so they can clean more effectively via swimming. They have a large, horse-size rubber pan in their pen, with a float valve to keep it full, and they could get in that to bathe. But they don’t seem to anymore; so I have to solve this problem next.

And finally, the lone Black Runner hen (her mate died after a serious leg injury). She is a looker, I think! Kirk was the one who wanted these, he thought they looked sleek; I think I’m starting to agree.


So, I think all four babies are some combination of these three ducks. The two dark babies are growing fast, and look very robust; I suspect they are the cross-breds. Perhaps they have “hybrid vigor”?

I wasn’t going to keep cross-breds originally, I like the idea of having fine-looking purebreds that produce expected and consistent results. But, I’m now realizing that I’d either have to pick one breed and stick with it or keep all the ducks contained in small pens so they could not cross. I enjoy different breeds, and may not want to stick to one. And, I like to let them free-range, so then can’t control who’s getting together with whom. So, my plans may change; I may just stick with good laying breeds, and let them cross freely, selecting for the most robust ones that are nice-looking, also suitable for training dogs (and maybe eating?).

Four Ducklings

So here are the healthy babies, cute as buttons!

They sure like to play in their water, I have to keep re-filling it! For now, they are in a wire dog crate (to keep dogs & cats out) with cardboard lining it (to keept them in). The crate is in the unfinished upstairs of the house. This weekend, I’ll have to start building them an outdoor pen. I am thinking of some kind of “chicken tractor” style of house that I can move easily, but I have yet to design it.  

I’m curious to see how the ducklings’ markings turn out. The “parents” I have are a pair of Silver Magpies, and a Black Runner Duck  hen. The two big babies we’re thinking look half Runner already, and look as though they’ll be black and white. The yellow guy has faint markings on his back, so he may be a silver Magpie. The little guy, I’m not so sure…