I finished the “duck tractor” (ala “chicken tractor”) last weekend– start-to-finish, including two shopping trips, over Saturday & Sunday. Ok, I need to do a little more trim-out still, it needs a ridge cap on the roof, and needs more staples on the chicken wire. But, it’s habitable, at least, so the ducks were able to “move out” on Sunday night! Phew! Here they are, settling into their new digs; read on for info on how I came up with this rig.
I’m fairly proud of my tractor design, I made it from scratch, and I think it looks pretty classy with a decidedly “northwest” architectural style! 🙂 I browsed the Web quite a bit looking for ideas, most of which are “chicken tractors”, not too many published ideas for ducks out there. I found a lot of nice ideas, but few people disclose their design details (lots of plans for sale, though). Here is a nice collection of chicken tractor photos compiled by the City Chicken website.
I needed to vary some from all the examples I saw. For one, I didn’t need to build nest boxes or perches, like one would need for chickens. Our weather is mild, and ducks are hardy, so they don’t need a plywood “house.” And two, I want to be able to walk inside the thing, to catch ducks, pick up eggs (which ducks often lay in random places), clean out, etc. Most of the designs I saw were only 4 feet high and 3-4 feet wide. If I had to crawl in there to grab a duck or a feed pan, I think my butt would get stuck! 😮
Yet, I appreciated the A-frame design of many I saw. A-frames use less lumber, arch designs are stronger and need less bracing than a “cube”, and the poultry don’t need headroom above a couple of feet. I also liked the whole “tractor” idea of making the structure move-able, with built-in handles and/or wheels. Since the farm is still in-planning, it’ll be nice to move the poultry houses around on a whim. They key is to make the tractor light enough to carry, but heavy enough that predators can’t slip under the bottom and wind won’t easily move it. So, that was my mission.
A-frames offer a mathematical challenge: that of calculating the dimensions of the sides and the corner angles. I wanted to maximize use of lumber, make it tall enough to walk in, but not so huge that it would be hard to move. Though I’m sure I calculated thousands of triangle dimensions in college, I’m sad to admit, I’d need a refresher to do trigonometry by hand now. So, I cheated, I used this handy online tool. I played around with the numbers, I knew I wanted the center peak to be about 6′ high, and I preferred the width to be around 4′ so it wouldn’t be unweildy (and so I could cut 8′ boards in half for that side). I wanted to render whole-number angles that I could set on my miter saw and which were easy to measure length-wise. What I came up with was an angle combination of 19° and 71°- not the most convenient measurements, yet I was able to make it work. It did make my brain hurt a little! 🙂
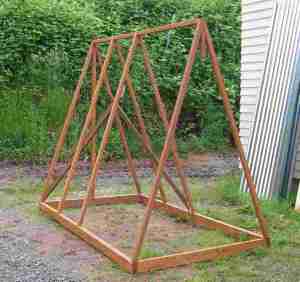
The most annoying part was that my miter saw only cuts angles up to 45°. So, to get those 71° jobbers, I had to set the saw to 19°, and butt the board up end-wise onto the saw. I imagine this probably violates safety advice for use of the saw or something. And it’s not real accurate, since the edge of the board doesn’t give enough contact with the back fence to ensure perpendicular alignment, and it’s hard to make sure the board doesn’t move. There is probably a much better way to do this, but it worked well enough for a duck pen, I just wouldn’t recommend this for finely-built custom cabinetry, by any means! Here is the start of the pen framework:
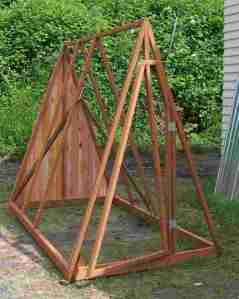
The pen is 8′ deep, 6′ tall, and 4′ wide, roughly. It’s exactly big enough for me to walk in (Kirk has to stoop). I made the rectangle floor from 2×4’s, then built up from there, making the ridge peak and diagonal sides from 2×2’s, threw in a couple of 1x4s for diagonal braces, screwing everything together, and then… the door. That part took me the longest, by far. You see, the pen is so narrow, I could not center a rectangular human-sized door, I had to use as much of the triangle as possible so I could fit through it. Yet, since I wanted it to hinge, and not slam shut when I let the door go, the hinges had to have a vertical side. Some people make these doors hinge from the bottom, flap-style, but I didn’t want to have to step over or onto a door laying on the ground. It occurs to me now that it might have been easier to make the door on a side panel, but I was fixated on making a “front” door at the time. So, here is what I came up with, this funky 5-sided door. Cutting the angles, and then assembling it was a bear, and then of course when I hung it, it sagged and bound with the frame, as doors and gates always like to do. Fortunately, a steep diagonal brace sorted that out (I wasn’t sure it would work at such a steep angle, but it did). Now it opens and closes flawlessly, with room to spare for swelling in wet weather.
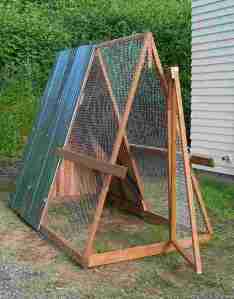
I covered the front half with chicken wire, and the back half with corregated metal roofing screwed right into the braces-no heavy plywood required. The back wall is made of thin vertical cedar fence boards, so that the ducks will have a reasonable wind screen in the back. It has no floor, because the idea is for the poultry to eat the grass they’re on, and it’s easier to pick up and move that way, no bedding to scoop out first. I used treated lumber, along with the cedar, because I didn’t want to have to paint anything; I like the look of raw materials. The whole project cost just under $200, not too bad! Here are the fruits of the weekend’s labor:
Kirk helped me move it, and it was pretty easy– the weight is perfect, light enough to move, heavy enough to sit still. The handles sticking out of the front make it slick for carrying travois-style, but I have to make a better handle for the back. For now, Kirk lifted it from the bottom, but that’s hard on the fingers, and will be dirty too. Maybe I’ll add wheels to the back.
The ducklings will need their heat lamp for several more weeks, that was easy to clamp onto the interior structure. They were pretty nervous in their new environment for a few minutes, the daddy duck strutted outside threateningly, and the collies immediately race-tracked around it. Despite all that scary stuff, the babies settled in soon and started enjoying the clover, tackled emptying the water tower with vigor, then snuggled under the lamp for the night. Then I had to clean up the mess in their cage upstairs, oh boy, shovels full of shavings soaked with about 10 gallons of water. Two weeks in the house is too long, I think!


