Ducks, ducks, and more ducks

I may appear to be obsessed with ducks lately, but I’m not, really! It’s only one small aspect of the farm I wish to grow, but it just happens to be the one going on right now! My third hatchling died a day after the others. <sigh> My guesses of what happened are:

1) the non-medicated poultry grower feed may have been mislabeled; medicated chicken feed can poison ducklings (and boy did their demise look like toxicity). So, as a precaution, I’m going to discard that bag of feed and will revert to just using my adult duck feed (which is really an adequate grower feed as well, at 20% protein).
2) the electrolyte solution I was using may have caused trouble; though I used it on the last batch of ducks with no harm. Many hatcheries and books recommend using electrolytes, but I noticed advice on Privett Hatchery’s website that they recommend against  it, especially in the first week. So, I’m going to skip out on that too.
3) The cilantro- I can’t imagine that being a problem, but just in case, I’m going to stick to very plain, and washed, greens.

I really want to build my flock now, I only have one hen left to lay, and I’m reluctant to use the incubator again until I have a way to control the room’s ambient temperature. So I decided purchasing some might be the best move, for the moment. On craigslist, I found a woman who wanted to go in on a hatchery order with some other people (to meet the minimum order size), so I opted to go with that.

Before those arrive, here is a nice photo of one of the last ducks hatching, just coming out of his shell.

Hatching duckling

More disappointments!

Today when I checked on my three baby ducks, two were dead! 🙁 I don’t know what happened, other than that I fed them chopped cilantro as greens yesterday- I wonder if that is somehow toxic to them? I feed it to the big ducks all the time with no trouble, and couldn’t find any indication on the web that it’s toxic. But I did find evidence that people use it for detox measures, so maybe there was some issue there on those little bodies.

Anyway, sad to see such cute babies dead; and the one remaining one seems in distress neurologically as well as from being alone. Singleton babies are never good. I’ve given him some Nux Vomica in hopes that it addresses any toxicity, that’s all I can do! I imagine I could raise animals my whole life and always be saddened to see one perish; but I guess I would never want to see myself lose that compassion for animals either. Every loss is hard.

I’m afraid to try more incubation (though I’m going to have to get back in the saddle sometime and figure out how to do it); and I don’t have enough eggs coming in to make it worthwhile now anyway. So, I’m thinking of ordering a batch; as I really want to increase my flock to around a dozen birds.

I’ve been tempted by Metzer Farms’ “Golden 300 Hybrid” that is specially selected for superior egg production. But… their colors aren’t the best. I must admit, despite all the utilitarian reasons I keep them, I also like them to look nice!

I think I may stick with the Runner and Magpie breeds, though neither have been laying for me as well as the books say. I don’t prefer Khaki Campbells as much (the other good laying breed), I don’t like their color and they are known to be excitable (and my mom’s Khaki mixes certainly are!)

I may mix in some Blue Swedish at some point to improve carcass weight and robustness; but stay generally with the black/blue/silver colors. I’ve resigned to the fact that purebreds aren’t going to work for me, as none of them is designed for all the things I want: eggs, meat, foraging and hardiness for herding (and looks!). 🙂

Disappointments

This weekend I had a couple of disappointments. 🙁 First, of my nine fertile duck eggs in the incubator, only three hatched! Those  three hatched on time, successfully, and are robust and healthy. But the other six were more full-term babies that must have perished about three days before the hatch-just before absorbing their yolks.

So, I don’t know what’s going wrong. My only guess is that with the warm summer weather, the temperature fluctuations are just too great inside the incubator. I believe that the heating element controller only has a variable resistor in it, that just determines how much power (or maybe some timing of an on/off cycle) goes to the  heating element. What would be better is a thermostatically controlled unit. I’d get it set right one day, then we’d have a hot or a cold day, and I’d notice the temp would be several degrees off in there! But, you would think that momma ducks would have the same problem nesting outside??

So, <sigh> I’m not sure what I’ll do next. It’s about $50+ to mail-order ten ducklings from a hatchery, and I’ve heard that mortality rates  are high in those too. So, it may be worth continuing to learn how to do them at home. Or, I could let mother ducks spend several months non-laying to raise their own. We’ll see. For now, I think nine total ducks may be enough. They seem to be staying safe all day while ranging free, despite the overhead raptor presence.

The second disappointment was the fourth side of fencing- it’s finished, but I didn’t stretch one side of it well enough, and it’s sort of puffy and saggy. Not only is it unattractive, I don’t think it’s as strong that way. I think I can fix it later by cutting it down the middle and tensioning each side back towards the middle, and then crimping the ends together. But, I’m going to put that off and live with it as-is for now.

But, the weekend was still good. I got a lot done, I have three cute baby ducks at least. We got a chance to go check out the local town’s festival and antique car show for a few hours today, and also had a great dinner out on Friday night. And, I am working on some interesting projects at work right now, so I don’t even mind that tomorrow is Monday! 😉

Blue Ducks

Blue Runner x Magpie ducks

I mentioned before I was wondering about the color genetics of my now two-month-old “baby” ducks. I re-read the color section in Holderread’s book (Storey’s Guide to Raising Ducks), and now I think I understand. So, I crossed a black Runner hen with a silver Magpie drake. Black x Silver always results in 100% blue offspring. So, these guys are technically “blue” ducks, and this cross will always give me this pattern.

The genetics of the black, blue, silver color crosses are as follows:
Blue x blue = 25% black, 50% blue, 25% silver
Blue x black = 50% black, 50% blue
Blue x silver  = 50% blue, 50% silver
Black x Silver = 100% blue
He doesn’t say what Silver x Silver produces, but I’m guessing 50% blue, 50% silver?

So, as subsequent generations of these blues mix with each other, or mix with the two Silver drakes I have now, I’m going to get all three colors in the future!

I wondered about their tiny black spots. The book explains that in the blue coloring (which is a dilute of black) typically some black “leaks through.” Of course, all will always have some pattern of white, since both the Magpies and Runners carry that gene.

Magpie Drakes

Here are my Magpie drakes, father and son. The son is very pretty, and I understand good markings are hard to get on Magpies. I said I’d never show my ducks, but I may change my mind about him! If only I can find out how you get them clean for the show table! I need some advice there.

I’m pleased with the crossbreeds; I wasn’t sure I was going to want crossbreeds at first. But I’m beginning to reflect that pure Runners are too delicate for dog work; and the Magpies are too heavy and slow. The cross makes an agile duck that’s still robust enough to resist injury. I’m also having better luck with the viability of the eggs-both times, I’ve had more crossbred eggs survive than the purebred Magpie eggs. Hybrid vigor?

Hatching Time

Here is an update on my ducks. First, the bad news. My black Runner duck hen died. 🙁 I was trying to separate them into different pens before dark, she split off on her own, got scared and hid in the blackberry vines. When it gets dark, they won’t come out and put themselves away in their pens like they do before dusk.
 
I feared that if I left her all night something would get her, so I risked using the dogs to help me find her. Well, Maggie found her, and bit her quick in the neck, and she died instantly. So, lesson learned, letting the dogs hunt for singleton ducks in the dark is a bad idea (it worked once before though!). I’m sad to lose her, she was a nice looking duck and a good layer. So, of my last summer’s investment in purebed show ducks, both Runners are gone, but both Magpies have persisted.
 
The good news is that I have nine fertile eggs in the incubator due today-2 Magpies and 7 half-breeds. Two have already hatched, and I’m hoping the rest will come through OK. The first two seemed to have a much easier time than the last batch, so I think my improved setup and extra humidity is helping.
 
Here is the broken-open egg of duck #1, you can see he made a textbook exit, and a day early to boot. The next photo shows him newly hatched and tired, all flopped out on the bottom of the incubator.
Perfect exit from the shell
 
This first little guy was lonely last night, it’s amazing how strong their instinct is to want to be with a group, or somebody. In desperation, he was jumping at the sides of the hatching pen to get closer to me! He kept issuing distress calls, and I worried about him experiencing that much stress all night, since his next of kin wouldn’t be arriving until the next day. So, I gave him a little stuffed animal, and that worked, he snuggled up to it and relaxed.
Hatchling
 
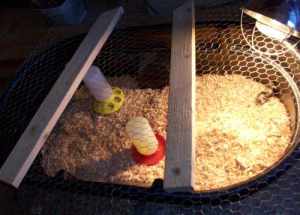
Here is my new hatcher setup. Last time, I used a wire dog crate, with cardboard lining the interior walls. That worked well, except that the small tray at the bottom couldn’t handle the water load of them spilling so much, and it eventually leaked on the floor (that was a mess!). So, I’ve changed to a livestock water trough with chicken wire on the top (and this is shut in a bedroom where dogs and cats can’t go!).
Hatcher.
Here are a few more incubation details. Though I’ve now added an electric egg turner to the device, you take it out the last three days, to allow the chicks to orient themselves for hatching. So, here is what the incubator looks like with the screen floor back in, and lots of sponge pieces to evaporate and add extra humidity. I’ve also been misting the eggs daily with water.

And, here are a couple of pictures of egg candling. I found that I don’t need a fancy device, just a strong flashlight, and cupping my hand in a “C” shape between the light and the egg does the trick. First, an infertile egg: you can see the yellow yolk in there, and no blood vessels at all– this one never started growing.

Infertile duck egg
 This next photo shows a fertile egg on day 26- the egg is completely dark, full of duckling, except for the air pocket at the top, which has grown quite large.Fertile duck egg.
This  time, I wrote (in pencil) on the eggs their laying date, so I could keep track of the viability of older eggs (some were kept two weeks in my pantry before incubating). That is working well, except I see now I should write on the end of the egg opposite to the air cell, because when they crack out, they are obscuring my writing!
 
This time too, when I set them for their last three days, I marked all the “tops” of the eggs with an “X.” I’ve found that when the first few start to hatch, they thrash around in there and roll the other eggs around. I suspect flipping some of them a day before they hatch may mess them up, so this time, I’m trying to put them back right-side-up if I notice they’ve been disturbed.

Fencing: 90% There!


Notice: Undefined index: file in /home/ja55j8r8hao2/public_html/wordpress/wp-includes/media.php on line 1675

I am taking vacation every Friday in July and August. I got a lot done this weekend, three whole days really help get regular chores done, plus extra things I want to do. I finished the fourth side of fence posts for the pasture, hooray! I have to put the cross-beams on four H-braces, and then it’s ready to stretch. After that, it needs four gates hung and it’ll be ready for livestock!

There are more things to be done in this pasture: it needs another line of fencing to segregate it from the lane. It needs the septic drain field fenced, to keep animals off that area, except for flash-grazing. And, it needs a permanent water supply. For now, I’m going to make do stretching a long hose from the house, and hauling water during freezing weather. But, my goal is to get it under graze as soon as possible, to put that grass to good use, and cut down on the amount of mowing needed. And, have something on which to train dogs!

I picked up some concrete at the local farm co-op store down the road today. I really enjoy that store; the man helping me load my stuff has been keeping track of my progress. He offered much encouragement today. We have a new Home Depot nearby, and I do appreciate the good prices and wide selection of such a big store. But, the employees there would never remember my name or what I’m working on, that’s for sure!

Emmer Flour and Products

A while back, I read in one of WSU’s alumni magazines a feature on a family farm in the Methow Valley where they are raising emmer (aka farro). Emmer is an ancient variety of wheat that is staging a comeback. I was intrigued. I like supporting family farms, especially local ones, and eastern  WA is about as local as a grain grower gets for me. 

I am also wary of all of the modern, hybridized food plants upon which we now depend. I cringe at some of the new “innovations” out there– like my neighbor uses that “Roundup Ready” corn variety, so they can use herbicide with abandon all season right on the food crop- yech! When I see someone reviving any kind of heritage breed of plant or animal, I give a silent cheer. The interesting thing about emmer is that it promises to be tolerable by many who are normally gluten intolerant-nice!

So, I was eager to give emmer a try. You can check out this family’s products here: Bluebird Grain Farms. I wasn’t sure what to expect, I figured maybe it would be some dowdy old grain with poor flavor or texture. But boy am I impressed! The whole grain berries are fabulous cooked according to the package instructions- boiled for an hour in broth, then lightly sauteed with some oil, garlic and herbs. They have a nice flavor and a hearty, chewy texture. Compared to bland modern wheat, emmer has a much more robust flavor.

The flour is also lovely– it has a very slight graininess to it that makes a wonderful texture in baked things. So far, I’ve made waffles and biscuits out of it, they were both very nice. Kirk noticed the difference in the waffles immediately, not knowing what I had changed, and commented how much more tasty they were than the last time I’d made them.

Strawberry Rhubarb PiesThis weekend, we had friends over for a BBQ, and I used the emmer flour for pie crusts in Strawberry Rhubarb Pie. That didn’t go so well, I think the emmer’s gluten quality, or maybe low gluten, just didn’t give enough stretch to the dough to make it workable. There was no way I could do the quarter-fold method to get the crusts centered in the pans, it would just break anywhere it was folded (and possibly my use of butter + coconut oil instead of Crisco-type grease didn’t help either, but that has worked ok for me in the past with white flour). So I had to more or less just fling the dough into the pans, and settle for an unwoven lattice top. It did mush together well enough that I was able to cobble together reasonable fluting.

The pies also turned out dark- the emmer flour is light colored in the bag, but develops a deeper brown in cooking, so they don’t look very traditional. They were still tasty, but I think I’ll go back to white flour for pies in the future.

Weekend Progress

Because we had friends over on Saturday, I spent a good bit of that day getting ready for that- cleaning house, and cooking. We also met new neighbors, which was nice! Our BBQ was fun, friends stayed until 12:30am, so I guess they had a good time, despite the mosquitoes!

So, that left Sunday for fencing. I only got three wood posts planted- it was HOT! So, slow going due to needing to drink every few minutes, and getting those posts lined up is very tedious. This last run of fencing has two gates and four H-braces, so needs a total of eight posts. <sigh> I’ll keep working on it…

Barn Cleanup and Other Things

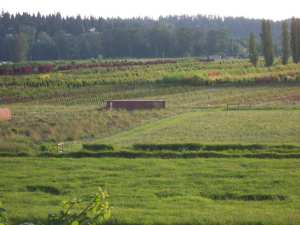
pasture looking down from hill, fencing.Here is a nicer photo of the pasture from “up top”; if you view this full size, you can see the new line of fencing here, and some of the beautiful colors coming out on the nursery trees. Now, if only there wasn’t a shipping container out there in the middle of the field…. We’re hoping this will resolved sooner or later.

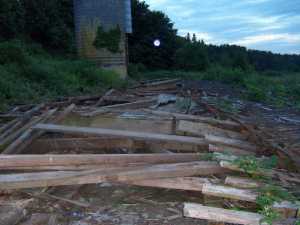
The rest of the old homestead barn fell down a few months ago, sadly. I have a copy of the building records- the original owner spent $587.67 on the barn and concrete silo, combined, in July, 1902! It was about 8500 square feet, made of fir logged off this site and a cedar shingle roof.

Barn cleanup

But, unfortunately, it looks like nobody ever re-roofed it, there is still a single layer of old-style, large shingles on it. And, it was lacking in structural supports in the lateral direction. So, there was just no saving it, at this point.

It’s amazing that it lasted as long as it did. Here is a photo of the cleanup effort currently, we have maybe 1/3 of the timbers cleaned up, and maybe 3/4 of the roof taken care of. We are saving any good wood we find, and there is quite a lot, but also much more is not salvageable– either rotted, or too damaged by some kind of wood boring beetle.

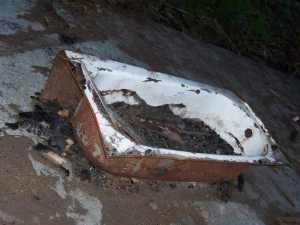
 We have been enjoying much of the wood for evening campfires, but have also had some small fires going during the day to help get rid of some of the wood (well, that is, only 3’x3′ campfires, cooking or religious fires are legal, so of course, we’ve never exceeded that! 😉 ). There are lots of bathtubs in (well, under, now) the barn that were used for feed and water troughs. So, Kirk is using a couple for shingle burning pits. In the end, they’ll go to the recycle center, but are getting one last use now.

Fence Clip Madness

Third side of fencing complete!This weekend’s progress included stretching a ~340′ section of fencing. My dad helped out this time. Here is a photo from up above by the house- you can’t really see much of the fencing, but it runs acrosss the field where the lightest mowed patch is. The shipping container is Neighbor Nick’s solution to his storage needs. Much of the background is neighbor Dick’s nursery tree crop. It’s really looking nice this time of year, many vibrant colors!

The fence stretching part goes pretty quick, I just tie off on one end post, unroll (this time, I got smart and used the tractor- I put the roll on a metal rod in the loader and backed up), tie the other end off to a metal tube, hook that to the tractor, and pull it until the tractor starts losing traction-that seems to be about the right tension. Then snip one horizontal wire at a time, wrap it around the end post, secure, and move on. When we got down to 3 wires, we slacked the tension, and then hand-tensioned each one of those using a fence stretcher. That took just a couple of hours.

T-post fence clip.Then came the hard part, that takes twice as long- the T-post “clippies!” Though only a few per post are required, I prefer to use more, to make the fence stay nice and flat- for aesthetic reasons mostly. So, I bet we put in a several hundred of those things on Saturday! My dad said his hands were cramping that night!

I have a couple of tools for twisting the clips, but my favorite one is the Fence Pro. It makes splendid looking clips, and is easy on the hands. The downside: it’s really easy to fling the tool a few yards by accident- and always, of course, on the opposite side of the fence from where you are working! And, the dang things get lost in the grass too easily, they embed in tall grass like Barbie-sized javelins, never to be spotted again. 🙁

I’ve ordered a couple more tonight, both to replace one that I lost, and also so I have more around to share when I have helpers. It’s nice to have a long one for good leverage, and also a half-sized one for tight spaces (you can cut them to your preferred length). It seems a little silly to pay $7.50 + S&H for such a simple thing, but I don’t begrudge the makers, this is indeed a fine tool!

My second favorite tool is the Wire Twist Tool from Kencove Farm Fence Supplies. It works great on the bottom clips that are near the ground. Kencove has a lot of really cool products and advice on their website and in their catalog. They have a good price on wire crimps, which saves me quite a bit compared to buying them five-to-a-packet at my local farm co-op. And, I like their slick (re-used, I think?) spice shaker bottles to hold them- no spewing crimps out of a bag onto the grass! I had some free web dollars to spend from a promotion, and I spent them all on fencing tools from Kencove! 🙂