 We enjoyed some summer weather last weekend with Chicago Style hot dogs (well, sausages, actually) made on the grill. Oh yeah! Continue reading “Chicago Style Dogs”
Category: Recipes
Chicken in the Crockpot Today
Sometimes I learn the most valuable things on other people’s blogs. This one is so simple, and yet mildly life-altering for me-how to cook a chicken in a crockpot in the most trivial fashion imaginable. I learned this from Wardeh’s blog post on crockpot chickens. It turns out, you just throw an entire chicken (or two, if they’ll fit in your crockpot), maybe go so far as to toss some salt and pepper in there, turn it on, and that’s it. Either cooking them overnight or all day renders ready-to-go chicken that can be used in anything. They create their own liquid, so there is nothing else to add.
When it’s done cooking, I take it out and let it cool for a bit. Then I quickly pick all the good meat off the bones and set aside for our uses. The cruddier meat I set aside for the dogs, I’ll get 1-2 meals’ worth of meat for them from one chicken! The oily stock that comes off the chicken I might save for soup base, or give it to the dogs. The bones get thrown away (cooked bones no good for dogs, they splinter and can puncture their intestines…). I would say there is, maybe, a 15-20 minute time investment in the whole thing.
This is so cool, before I read this, I had no idea it was so easy. I had visions of roasting the chicken in the oven, basting it, tending to it, keeping an eye on its temperature– a lot of work and being in the house all day just to get some chicken ready for a recipe. So, I’d steered clear of things that call for roasted, chopped chicken.
But, now, with this, I find there are lots of things I can do with the chicken, I can get several meals out of it. Like, chicken soup, chicken casserole, chicken salad, chicken sandwiches, chicken quesadillas, chicken chili, and chicken enchiladas. So, that’s what’s on the menu for today, and possibly tomorrow: something with chicken in it, as I have one in a crockpot this morning.
Good Cookin’
 One thing that Kirk and I have learned to enjoy together is cooking good food. This is of great help to me, because though I enjoy cooking, I never really liked doing it when I lived by myself. I had trouble knowing how to cook meat, and I’d get sick of all the leftovers. So, when I was single, I tended to live off of frozen dinners, cheese and crackers, other highly processed food, and also eating out way too much. I was impatient about sitting down to eat, and would tend to do it while working on the computer, thus compounding my bad health habits by not paying attention to how much I ate!
Now, we are getting into a pretty good groove of shopping ahead, and planning diverse, reasonably healthy meals. I say reasonably, because we probably need to make a few tweaks-less meat, more whole grain, increased fruits & veggies. But, we do pretty well, and definitely a lot better than I ever did living alone! And, we can enjoy some fine foods that would otherwise cost a fortune at a restaurant, and save money overall by eating leftovers for lunch the next day. We often end up with too many leftovers in general, but then those go into the dog food. So nothing is wasted.
Here is a favorite of ours, Salmon Moqueca, that we made last weekend. It is apparently derived from Brazilian food flair, though sometimes I take it more in a Thai direction, depending on what spices I happen to grab. I have made this enough now that I don’t often look at the recipe when choosing the spices.
Salmon Moqueca
-Make a batch of brown rice in a rice cooker. Brown rice goes with this recipe much better than white rice, IMO.
Marinate 1 pound salmon fillet, with skin, in:
1/2 tsp ground fenugreek seeds [I don’t have fenugreek, but make do without it…]
2 tbsp red or white wine vinegar
1 tsp ground coriander seeds
1 tsp ground cumin
12/ tsp cayenne
1/4 tsp turmeric
You’re supposed to try to marinate for at least a half hour, sometimes I pull this off, sometimes not. I also don’t measure the spices, I just toss in whatever strikes my fancy, and often prefer to use a lot more vinegar to get a nice deep soak for the salmon. After marinating, pan-fry the salmon in olive oil or butter, peel of the skin, set aside.
Saute together:
1 clove garlic, chopped
1/4 c chopped green onions
1/4 c chopped tomato
1/4 c chopped bell peppers
1 small onion, chopped
1 tsp paprika
Mix in & simmer:
1/2 c. canned coconut milk
1/2 c. sour cream
[I often use more, I mix them together, and add salt, rice wine vinegar to taste; to get the right balance of sweet, tangy and salty.]
Serve salmon on top of rice, topped with vegetable stew sauce and a garnish of chopped cilantro.
A Little Baking
 I have been a baking fan on and off in my life since I was a grade schooler. But lately it had fallen by the wayside, I just wasn’t making time for it, and wasn’t keeping the right stock of ingredients around to make things. It’s been on my mind, with the prices of sweet treats in the store and that there aren’t many choices there for cookies etc. made from reasonably healthy ingredients. Then, recently, Stonehead’s blog post on “Squeezing in more baking”gave me the nudge I needed to reflect that making cookies and quick breads really doesn’t take much time at all-maybe twenty minutes.
So, last week I made chocolate chip cookies, and last night, Pumpkin Cream Cheese Bread. The latter is pretty scrumptious. I had snipped this recipe from a newspaper, but the proportions weren’t right. I think the author mistakenly halved the bread quantities but left the cream filling double. So the first time I tried it, I had low-profile loaves with an out-of-control amount of filling. This time, I was able to fix the numbers, and it came out more like I was anticipating. And, I like recipes like this, with very simple measurements and instructions. A perfect comfort food for these crisp fall days!
Pumpkin Cream Cheese Quick Bread
Cream cheese filling: beat together:
8 oz pkg cream cheese
1/2 c sugar
1 tbsp flour
1 egg
1 tsp orange zest
“Dry” ingredients: sift together in a bowl:
3 1/3 c flour
2 tsp baking soda
1 tsp salt
1 tsp cinnamon
1 tsp cloves
1 tsp pumpkin pie spice
“Wet” ingredients: beat together in a separate bowl:
2 c pumpkin puree
1 c veg oil
4 eggs
3 c sugar
Beat together wet & dry ingredients til just combined. Cover bottoms of both baking pans with enough batter to make about 1/3 of the total volume of each loaf. Spread cream cheese filling in”channels” down the middle of each loaf. Top with remaining batter, spread to cover cream cheese.
Bake @ 350 for 70+ minutes, until tops spring back when touched & they pass the toothpick test. Cool 10 min in pans, then cool more on wire racks.
Emmer Flour and Products
A while back, I read in one of WSU’s alumni magazines a feature on a family farm in the Methow Valley where they are raising emmer (aka farro). Emmer is an ancient variety of wheat that is staging a comeback. I was intrigued. I like supporting family farms, especially local ones, and eastern WA is about as local as a grain grower gets for me.
I am also wary of all of the modern, hybridized food plants upon which we now depend. I cringe at some of the new “innovations” out there– like my neighbor uses that “Roundup Ready” corn variety, so they can use herbicide with abandon all season right on the food crop- yech! When I see someone reviving any kind of heritage breed of plant or animal, I give a silent cheer. The interesting thing about emmer is that it promises to be tolerable by many who are normally gluten intolerant-nice!
So, I was eager to give emmer a try. You can check out this family’s products here: Bluebird Grain Farms. I wasn’t sure what to expect, I figured maybe it would be some dowdy old grain with poor flavor or texture. But boy am I impressed! The whole grain berries are fabulous cooked according to the package instructions- boiled for an hour in broth, then lightly sauteed with some oil, garlic and herbs. They have a nice flavor and a hearty, chewy texture. Compared to bland modern wheat, emmer has a much more robust flavor.
The flour is also lovely– it has a very slight graininess to it that makes a wonderful texture in baked things. So far, I’ve made waffles and biscuits out of it, they were both very nice. Kirk noticed the difference in the waffles immediately, not knowing what I had changed, and commented how much more tasty they were than the last time I’d made them.
 This weekend, we had friends over for a BBQ, and I used the emmer flour for pie crusts in Strawberry Rhubarb Pie. That didn’t go so well, I think the emmer’s gluten quality, or maybe low gluten, just didn’t give enough stretch to the dough to make it workable. There was no way I could do the quarter-fold method to get the crusts centered in the pans, it would just break anywhere it was folded (and possibly my use of butter + coconut oil instead of Crisco-type grease didn’t help either, but that has worked ok for me in the past with white flour). So I had to more or less just fling the dough into the pans, and settle for an unwoven lattice top. It did mush together well enough that I was able to cobble together reasonable fluting.
The pies also turned out dark- the emmer flour is light colored in the bag, but develops a deeper brown in cooking, so they don’t look very traditional. They were still tasty, but I think I’ll go back to white flour for pies in the future.
Fruit Salsa
My bowl of fruit salsa looked so nice this time, I thought to take a picture. Here’s my best stab at sharing the recipe; though I never measure and easily sub-in different ingredients depending on what’s available or in season. I think you can’t go wrong when blending fruits and veggies- they all go well together!
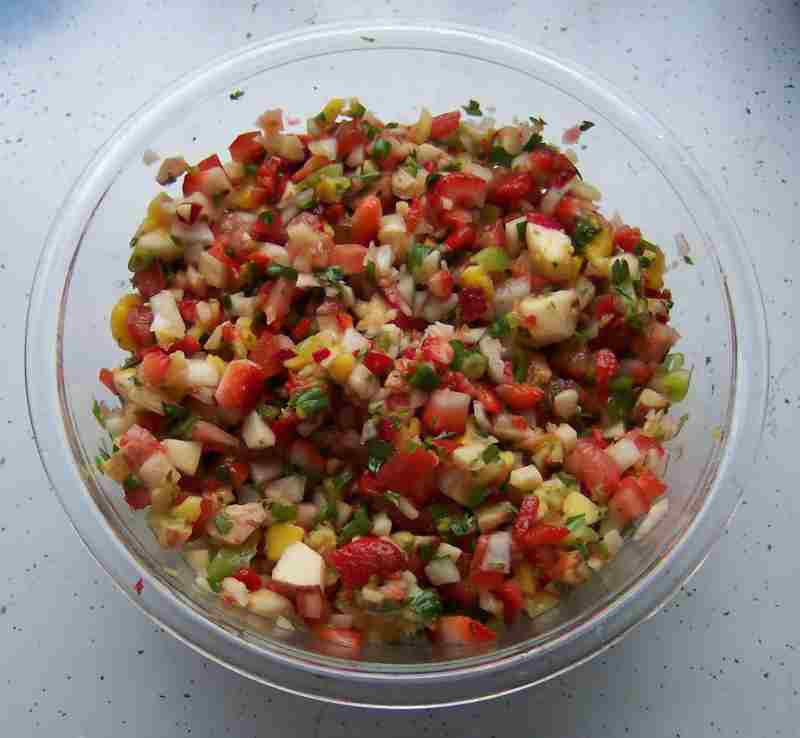
Chop and mix together:
Tomatoes (not too many of these, as they can overwhelm the fruit flavors)
Peppers: red, orange, yellow and/or green
Hot Peppers: serranos, jalepeños, red peppers- to taste. [If you like more heat, let more of the seeds slip into the final product.]
White or yellow onion
Green onions
Apple (skin left on is ok)
Mango
Strawberries
Blueberries
Cilantro
–>Add Salt, pepper and lemon or lime juice to taste. The idea is to balance sweet, salty, tangy and spicy all together…
Fruit salsa goes great with white fish and rice cooked in coconut milk. It’s also good in wraps with the same coconut rice paired with chicken and a yogurt sauce. And, of course, it’s great for dipping tortilla chips too!