Chores and more chores

This weekend I did get to dabble a little on the fencing; I have all but one gate hung, and all of those now latch. There is just the tiniest bit of work left to make that field livestock-ready: one 12′ section of fence to stretch, one more gate, and fixing some “airspace” under one gate that’s on a slope. But, I didn’t get to that.

I had to finish the tractor’s 100 hour maintenance list, which takes some time-oil change, grease the fittings, check all the fluids, clean the air filter, etc. And, then I worked on field mowing, which is about a 4+ hour job for each of the two mowed fields. I got more than half of the main field done.

Mowing is pretty relaxing, it’s enjoyable to see a local hawk taking advantage of flushed mice. And the swallows go bananas over the insects that mowing excites– I had several dozen birds swerving and swooping all around me. They are so acrobatic, it’s amazing they don’t hit the tractor, or each other, when they are in such a feeding frenzy. I love the smell of mowing too, its reminiscent of my days driving pea harvesters as a summer job in college- a mix of diesel, hot machines, and cut greenery. The noise and the slow pace are mesmerizing, it’s a good time to contemplate many things.

Sunday my mom and I also worked on dog 4-H fair entries-it’s almost county fair time for us. Years ago, I wrote an Access database to track all of the 200+ dog show entries for our 11-day fair, which helps with scheduling, score tabulation, prize calculation, and state fair qualification tracking. But, it requires about eight hours of data entry before the fair to transfer paper entries into electronic records-worth it for the time it saves in the office during the fair, when things are hectic.

Of course, I’m the only volunteer resource who knows how to really use the database, so I’ve signed up for a lifetime commitment at database maintenence, I think! But, I enjoy helping, and I enjoy the fair. Next year, I strive to make Excel spreadsheets where each 4-H leader can type in their own data, that would really save me time, as I could just import it.

Kirk has asked me about ten times about the Nubian goats at the fair, whether there will be some for sale at the Open Show. He has his heart set on a black Nubian doe. Our friend Lori also loves animals and goats, and aspires to own one, but doesn’t yet have the place for one. So, she offered to “fund” one that we’d house, and she could visit. We could use a blackberry eater that could be tethered on the slopes during the day to help with clearing. So, that may be a next project: making a night pen for a goat to stay safe so that we can add to the growing menagerie.

Kirk has made tons of progress on barn wood cleanup, I’ll have to snap a picture soon. This week, I have to finish mowing, and then prepare for one last herding trial trip for this year. Friday I’m headed to a beatiful farm on Whidbey Island, and will camp there in the trailer for the weekend during the trial.

Disappointments

This weekend I had a couple of disappointments. 🙁 First, of my nine fertile duck eggs in the incubator, only three hatched! Those  three hatched on time, successfully, and are robust and healthy. But the other six were more full-term babies that must have perished about three days before the hatch-just before absorbing their yolks.

So, I don’t know what’s going wrong. My only guess is that with the warm summer weather, the temperature fluctuations are just too great inside the incubator. I believe that the heating element controller only has a variable resistor in it, that just determines how much power (or maybe some timing of an on/off cycle) goes to the  heating element. What would be better is a thermostatically controlled unit. I’d get it set right one day, then we’d have a hot or a cold day, and I’d notice the temp would be several degrees off in there! But, you would think that momma ducks would have the same problem nesting outside??

So, <sigh> I’m not sure what I’ll do next. It’s about $50+ to mail-order ten ducklings from a hatchery, and I’ve heard that mortality rates  are high in those too. So, it may be worth continuing to learn how to do them at home. Or, I could let mother ducks spend several months non-laying to raise their own. We’ll see. For now, I think nine total ducks may be enough. They seem to be staying safe all day while ranging free, despite the overhead raptor presence.

The second disappointment was the fourth side of fencing- it’s finished, but I didn’t stretch one side of it well enough, and it’s sort of puffy and saggy. Not only is it unattractive, I don’t think it’s as strong that way. I think I can fix it later by cutting it down the middle and tensioning each side back towards the middle, and then crimping the ends together. But, I’m going to put that off and live with it as-is for now.

But, the weekend was still good. I got a lot done, I have three cute baby ducks at least. We got a chance to go check out the local town’s festival and antique car show for a few hours today, and also had a great dinner out on Friday night. And, I am working on some interesting projects at work right now, so I don’t even mind that tomorrow is Monday! 😉

Fencing: 90% There!


Notice: Undefined index: file in /home/ja55j8r8hao2/public_html/wordpress/wp-includes/media.php on line 1675

I am taking vacation every Friday in July and August. I got a lot done this weekend, three whole days really help get regular chores done, plus extra things I want to do. I finished the fourth side of fence posts for the pasture, hooray! I have to put the cross-beams on four H-braces, and then it’s ready to stretch. After that, it needs four gates hung and it’ll be ready for livestock!

There are more things to be done in this pasture: it needs another line of fencing to segregate it from the lane. It needs the septic drain field fenced, to keep animals off that area, except for flash-grazing. And, it needs a permanent water supply. For now, I’m going to make do stretching a long hose from the house, and hauling water during freezing weather. But, my goal is to get it under graze as soon as possible, to put that grass to good use, and cut down on the amount of mowing needed. And, have something on which to train dogs!

I picked up some concrete at the local farm co-op store down the road today. I really enjoy that store; the man helping me load my stuff has been keeping track of my progress. He offered much encouragement today. We have a new Home Depot nearby, and I do appreciate the good prices and wide selection of such a big store. But, the employees there would never remember my name or what I’m working on, that’s for sure!

Weekend Progress

Because we had friends over on Saturday, I spent a good bit of that day getting ready for that- cleaning house, and cooking. We also met new neighbors, which was nice! Our BBQ was fun, friends stayed until 12:30am, so I guess they had a good time, despite the mosquitoes!

So, that left Sunday for fencing. I only got three wood posts planted- it was HOT! So, slow going due to needing to drink every few minutes, and getting those posts lined up is very tedious. This last run of fencing has two gates and four H-braces, so needs a total of eight posts. <sigh> I’ll keep working on it…

Barn Cleanup and Other Things

pasture looking down from hill, fencing.Here is a nicer photo of the pasture from “up top”; if you view this full size, you can see the new line of fencing here, and some of the beautiful colors coming out on the nursery trees. Now, if only there wasn’t a shipping container out there in the middle of the field…. We’re hoping this will resolved sooner or later.

The rest of the old homestead barn fell down a few months ago, sadly. I have a copy of the building records- the original owner spent $587.67 on the barn and concrete silo, combined, in July, 1902! It was about 8500 square feet, made of fir logged off this site and a cedar shingle roof.

Barn cleanup

But, unfortunately, it looks like nobody ever re-roofed it, there is still a single layer of old-style, large shingles on it. And, it was lacking in structural supports in the lateral direction. So, there was just no saving it, at this point.

It’s amazing that it lasted as long as it did. Here is a photo of the cleanup effort currently, we have maybe 1/3 of the timbers cleaned up, and maybe 3/4 of the roof taken care of. We are saving any good wood we find, and there is quite a lot, but also much more is not salvageable– either rotted, or too damaged by some kind of wood boring beetle.

 We have been enjoying much of the wood for evening campfires, but have also had some small fires going during the day to help get rid of some of the wood (well, that is, only 3’x3′ campfires, cooking or religious fires are legal, so of course, we’ve never exceeded that! 😉 ). There are lots of bathtubs in (well, under, now) the barn that were used for feed and water troughs. So, Kirk is using a couple for shingle burning pits. In the end, they’ll go to the recycle center, but are getting one last use now.

Fence Clip Madness

Third side of fencing complete!This weekend’s progress included stretching a ~340′ section of fencing. My dad helped out this time. Here is a photo from up above by the house- you can’t really see much of the fencing, but it runs acrosss the field where the lightest mowed patch is. The shipping container is Neighbor Nick’s solution to his storage needs. Much of the background is neighbor Dick’s nursery tree crop. It’s really looking nice this time of year, many vibrant colors!

The fence stretching part goes pretty quick, I just tie off on one end post, unroll (this time, I got smart and used the tractor- I put the roll on a metal rod in the loader and backed up), tie the other end off to a metal tube, hook that to the tractor, and pull it until the tractor starts losing traction-that seems to be about the right tension. Then snip one horizontal wire at a time, wrap it around the end post, secure, and move on. When we got down to 3 wires, we slacked the tension, and then hand-tensioned each one of those using a fence stretcher. That took just a couple of hours.

T-post fence clip.Then came the hard part, that takes twice as long- the T-post “clippies!” Though only a few per post are required, I prefer to use more, to make the fence stay nice and flat- for aesthetic reasons mostly. So, I bet we put in a several hundred of those things on Saturday! My dad said his hands were cramping that night!

I have a couple of tools for twisting the clips, but my favorite one is the Fence Pro. It makes splendid looking clips, and is easy on the hands. The downside: it’s really easy to fling the tool a few yards by accident- and always, of course, on the opposite side of the fence from where you are working! And, the dang things get lost in the grass too easily, they embed in tall grass like Barbie-sized javelins, never to be spotted again. 🙁

I’ve ordered a couple more tonight, both to replace one that I lost, and also so I have more around to share when I have helpers. It’s nice to have a long one for good leverage, and also a half-sized one for tight spaces (you can cut them to your preferred length). It seems a little silly to pay $7.50 + S&H for such a simple thing, but I don’t begrudge the makers, this is indeed a fine tool!

My second favorite tool is the Wire Twist Tool from Kencove Farm Fence Supplies. It works great on the bottom clips that are near the ground. Kencove has a lot of really cool products and advice on their website and in their catalog. They have a good price on wire crimps, which saves me quite a bit compared to buying them five-to-a-packet at my local farm co-op. And, I like their slick (re-used, I think?) spice shaker bottles to hold them- no spewing crimps out of a bag onto the grass! I had some free web dollars to spend from a promotion, and I spent them all on fencing tools from Kencove! 🙂

Setting Fence Posts

I’ve been setting fence posts the last few weeks, getting ready to stretch another line of field fence. I’ve chosen to do a ratio of one wood post per 9 metal “T” posts. The wood posts are 4×4″ treated, and the T-posts are 8′ heavy duty ones, driven into the ground 3 feet. I’m spacing them 12′ apart. This seems to be strong enough, and balances economy of materials with the need for robust fencing. But, I feel very unsure about what the “right” numbers are, because there is so much varying advice and evidence of application.

One thing I do value is the ability of the fence to “spring” a little bit. Knowing that when working dogs, it’s possible livestock might, ah, occasionally get run into the fence full-boar with a young dog in hot pursuit, I don’t want it to be as hard as a brick wall when they hit it. That’ll either break the fence or break the animal, one of the two! This fence does seem to have good flex, but seems strong enough to resist my hardest pushing, and then some. I’ll report back if I regret any of my decisions once dogs and livestock put it to the test!

I’ve chosen to put concrete around the bottoms of the wood posts. This is a subject of debate for many too– concrete makes them a bear to get out, if you ever need to. And, it’s tough to say whether concrete concentrates water around the post more, making it rot sooner than well-drained soil would. But, the deciding factor for me was, my neighbor Bob, a long-time farmer, warned that if you don’t use concrete in the flood plain (which is where the pasture is), you could find your whole fence afloat when the water comes. He speaks from experience, apparently, so I’m going with his advice.

Anchor bolts at the bottom of a fence post.A handy tip I found in a book is to screw galvanized bolts about halfway into the posts where they will contact the concrete. This binds the concrete and post together, so that the post cannot slide or twist within its concrete shell. Here (left) is what I’ve been doing on the bottoms of my posts.

The wood posts are fairly easy to install since I have a post hole digger on the tractor. Tinkering with getting them aligned with the string line is the biggest hassle. The T-posts, I only drive in barely by hand using a fence post driver. When I have a whole line in, I mark the bottoms at 5′ tall, then drive along with the tractor, and push them in down to their marks using the tractor loader. My dad gave me that tip. They go in “like butter” this way, and it sure saves the hard labor of fence post driving!

Last Weekend’s Progress

Last weekend did prove fruitful for me, despite taking the break to host a family gathering, and all of us staying up late Saturday night around the campfire. Here’s the picnic table chore done:

 picnic table

I had some struggles with the Millstead kit missing some of the lumber, went back to Home Depot to get replacements, only to find the next kit we opened was also defective. So, they gave me a 2×2 and I cut my own mitered angles at home, which was annoying, since the whole point of a kit is to not have the hassle of getting out your saw and measuring things! Oh well, it still went together quickly enough to be ready for use the same day, I’m sure much more quickly than if I had built it from scratch, judging by how long the duck tractor took me. Kirk did the sanding and finishing, it turned out nice! We are enjoying eating on it in the nice weather we’ve been having.

I also got a whole line of fence posts done over the weekend, and finished up the H-braces during the week. So, that side of fence is ready to stretch-that’s Saturday’s task.

The baby ducks are growing, they are almost 4 weeks old. They have very “tweenie” feathers, and their markings continue to hold my interest, wondering how they’ll turn out! This isn’t a very good picture, it was getting dark when I took it…

Baby ducks 4 weeks old

Fencing little by little

Wednesday night I got a wee bit of fencing prep done, I went out and measured and marked the post locations on a whole line. But then, I realized I made a math error (darn those, I seem to be challenged in that area) and had to re-do several of the marks. That’s annoying, trying to orange-spray-paint not-so-little notes to myself on roughly mowed grass, “Ignore this post marker, wrong spot, use that one over there…” Hopefully I can remember how to interpret my notations when I go back to place the posts!

I was also vexed to see that one of the wood brace posts I’d concreted-in had somehow shifted, it’s 2″ off the string line, and I had them SO perfect when I set them! Maybe some deer leaned up against it for an hour smoking a cigarette there, 😉 I don’t know; I can’t imagine how they could have moved! So, now I’m debating whether to ignore the flaw and let the fence be crooked there, or to add a 2″ board onto that post to fix the line. Hmm.

After this chore, and after wrestling Old Chessie back to the house (poor, senile dog, he tends to just wander, and fall down, in the field) we watched No Country for Old Men, a Cohen Brothers film. It was violent, which I don’t like, but still a good watch. They have such a weird style, it’s hard not to appreciate their oddity, I guess.

The Case for the H-Brace

I have been doing a lot of reading about fencing design. I checked out about a dozen books on fencing from the library, but found them all to be inadequate in their treatment of non-decorative, practical fencing for livestock. So, the “Interweb” (as Kirk likes to call it) helped me a lot. These nice folks at Gateway Farm Alpacas have the best advice, by far, that I have found for installing field fencing, which is the  type I chose to use. I also found good help on the websites of fencing manufacturers, with installation instructions for their own products.

It occurs to me that perhaps the most important component of any fence under tension is the end-bracing. Granted, I’m not doing a high-tensile fence, but field fencing still takes plenty of stretching to make it strong and non-saggy. I have come to realize that there isn’t a lot of good advice out there about designing end-braces, or the “why” behind the design. And as I drive through our county, I see many more examples of failed end-braces than successful ones. So, after a lot of reading, studying other people’s mistakes, and thinking, here is what I’ve concluded on the end-brace debate. Now, I’m no mechanical or civil engineer, I’m of the electrical bent; but I did have to take a few ME and CE courses in college, enough that I grasp the basics of statics & dynamics, and physics. So, here is my stab at explaining what happens to end-braces, why they are prone to failure, and how to best ensure their strength and longevity.

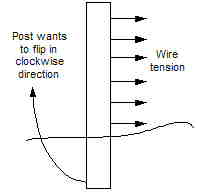
The first step is to think about what is happening to the end post on which multiple horizontal wires are pulling. The most concerning point is near the top of the post, due to torque (think of a long lever…), the force on the post is greatest here. The post, especially if you didn’t bury it really deep, is going to want to “flip” sideways out of its hole. This is because the bottom isn’t going to experience enough resistance from the soil to counteract all that force on the top of the “lever.” The soil is going to “give in” and erupt vertically, allowing the post to migrate and eventually lean, which allows the fencing to become slack at the top. This will mostly likely happen very slowly over years; though I have heard of it happening to people the instant they tensioned the fence, if they did an especially poor job of brace design! Here is a picture of what this lever action looks like:

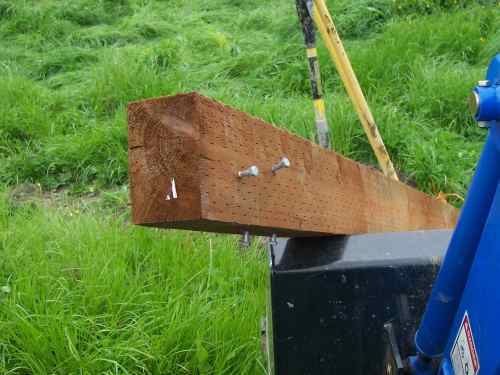
Additionally, the post is also going to want to bend, because its tensile strength is being challenged. This part is easier to address by using very thick (usually 6″x6″) posts with no flaws, which offer greater tensile strength. So, that just leaves the leaning tendency to fix. There are many solutions people offer to address this problem. But I feel the most practical and wisest solution is the “H-brace.” The idea is to transfer most of this load to a second post, and allow that post transfer the load back to the bottom of the first post, offering a counter-force. So, first let’s focus on transferring the load to the second post:


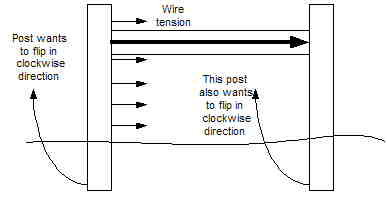
By putting a horizontal beam in between the end post and second post, it’s easy to see that much of the load on the first post will now be pushing on the top of the second post. But, this, by itself, is no help; because of course the second post is now going to want to “flip” in a clockwise direction too. What’s needed is a diagonal wire wrapped around both posts, tied back down to the bottom of the first post, and then tensioned, to transfer the load back down to the bottom end of the “lever.”

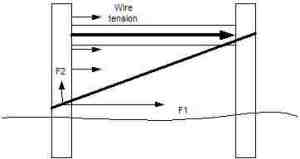
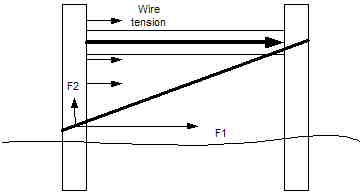
Above, you can see how the diagonal wire is going to pull on the bottom of the end post as a reaction to the cross-piece pushing on the second post. Physics 101 teaches you how to break down a diagonal force vector into is horizontal and vertical components (F1 and F2 in the diagram). You can do this mathematically using trigonometry, but here I’m just going to show it intuitively, the precise math isn’t as important as the general concept.

The goal is to create a “long” triangle as above, where the wire is pulling more in the horizontal direction (F1) than the vertical (F2). The vertical component of force (F2) is actually undesirable, because it’s going to encourage the post to pull up out of the soil, so we want that to be as small as we can manage. What we want is more F1 force, which will counteract the lever action happening at the top of the post, pulling it at the bottom to make it stay standing up straight.

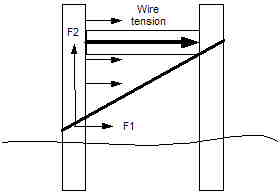
The mistake many people make is creating too narrow of an H-brace, so that their diagonal wire has a very steep angle, instead of a very flat angle. This means there is more upward (F2) force than sideways (F1) force, so over time, the end post could possibly pop out of the ground from the vertical strain. The rule of thumb I’ve read is that you want angle no bigger than 45° from the ground, and preferably less. So make your H at least twice as wide as your fence is tall, though 2.5 times as wide is better.

The reason H-braces are the most popular method is that they are the easiest and cheapest to install. Merely:
1. drill holes for, and then pound in brace pins (foot-long rebar works well) to secure the cross-beam (you can notch the posts too, but it’s extra work, and doesn’t gain much),
2. use a heavy gauge wire for the diagonal, securing it with staples top and bottom (or you can hook it over a sticking-out brace pin at the top),
3. then tension the wire by twisting a “twitch” stick in the middle of it (or use a new-fangled, store-bought tensioner device) until its firm.

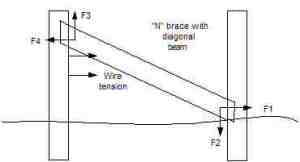
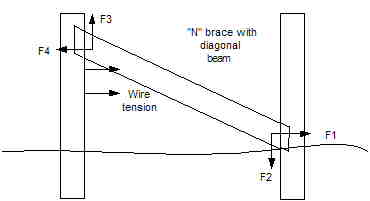
One alternative method to the H-brace is an “N” shaped brace. It involves making a diagonal out of another beam, that travels from the top of the end post down to the bottom of the second post, so that as the end post wants to “flip”, it’s pushing against a diagonal brace that resists this motion. The theory is good, but I think this method is less practical because first, you have to buy an expensive, long post to make that diagonal (a 10- or 12-footer for a 4′ high fence), rather than letting inexpensive wire be the long component. And, it’s more challenging to truly secure that diagonal to the end points, so that things won’t just “scoot” around, or cause nails to pop, when forces are applied. You need to do a fancier job of notching and securing, which is often inconvenient when you are way out in a pasture without power and your whole tool box. Wire is a lot easier to secure than an angled junction between to beams, especially for laymen.

 \

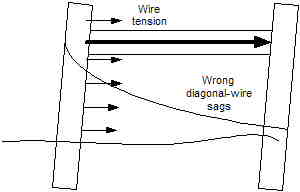
I’ve often seen examples of braces where someone put the diagonal wire in the wrong direction. This actually has zero affect long-term, because as the end post starts to lean, it’ll slacken the tension on the diagonal wire, such that it starts to do absolutely nothing. But when first built, the moment the diagonal wire is tensioned, it’s actually going to put more force on the top of the end post, causing it to want to lean more than ever! In this case, the only saving grace of the “H” is that the load is still shared between the two posts, which is better than nothing at all; but it’ll probably still fail over time.

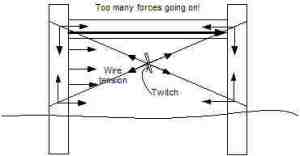
Another mistake I’ve seen is people putting diagonal wires in both directions, and then tying them together by twisting the twitch stick in the middle of both. If you feel you must do two diagonals (which makes sense on an H-brace that’s mid-run on a long fence line, or if you have a gate pulling on an end post in the opposite direction of the fence tension), they must be independent of each other, so they can each counteract their own forces. If they are tied together, you are crippling the one that’s experiencing the most load, and transferring loads to places where you don’t want them. As you can see from the diagram below, there are 14 different force vectors to worry about, that are all influencing each other- way too complicated to get it right!

 Connected diagonals in an H-brace

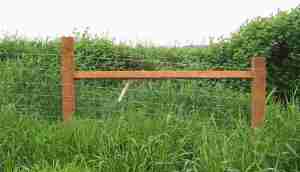
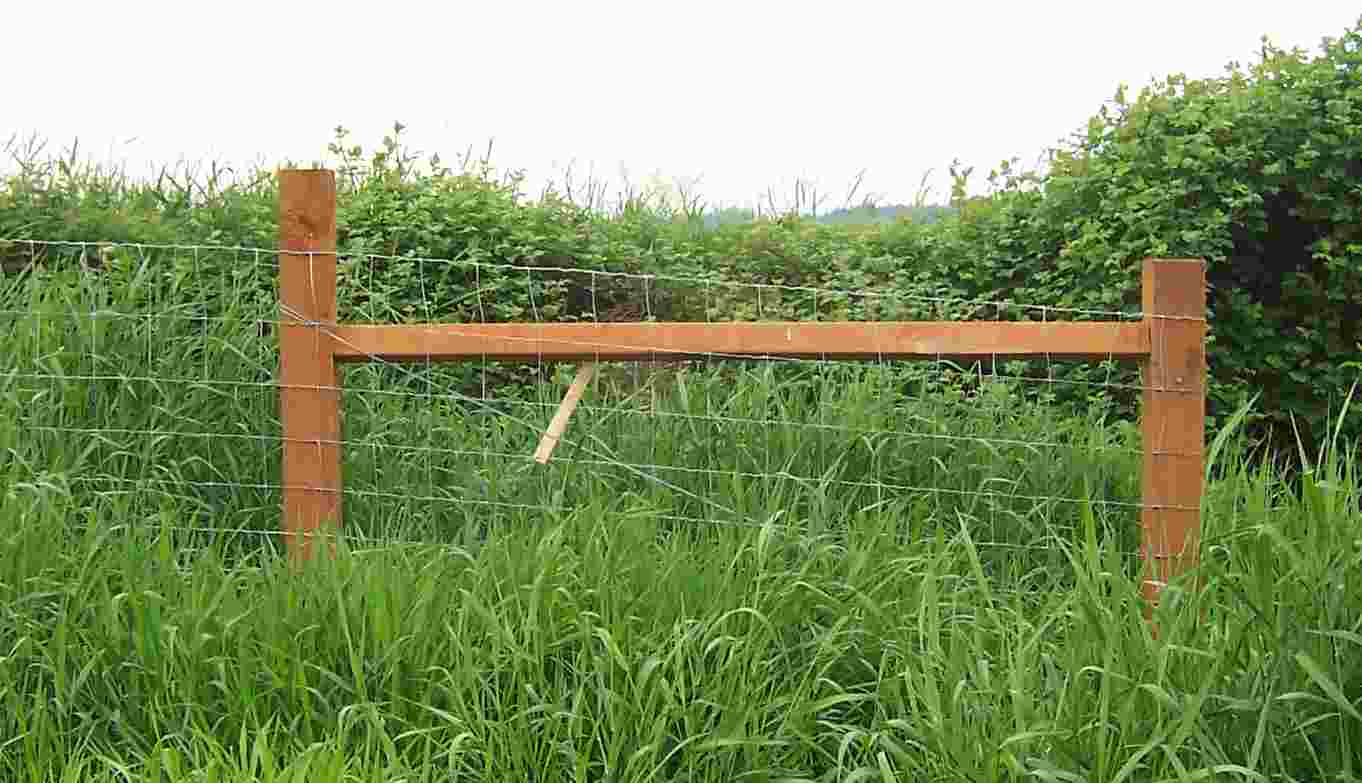
Here is how one of my H-braces turned out; I used 8’x6″x6″ treated timbers here for the posts, buried about 3′ deep; and a 8’x4″x4″ as the cross-beam, tilted slightly so water will run off it. The fence in this case is running off to the left. This brace is enduring quite a slope change; sometime maybe I’ll go back and cut off the second post a little shorter for aesthetic purposes to make it match! These seem to be holding strong, so far, under the tension of the newly-strung fence, knock on wood!