Planning More Fencing

I have finally started on fencing the second pasture. Really, I started a few months ago, with the planning, but that takes a lot of time, so only just this last week was I able to start putting in posts. I have a master plan of the fencing layout of the whole property, which I have drawn up in Visio. It shows the high-level workflow of gates, tractor drive areas, ditches, culverts and bridges. It looks like this:

FarmMap2

But when I’m ready to fence a particular rectangle, I need  second drawing to help me figure out the materials list. Continue reading “Planning More Fencing”

Fancy New Dog Potty Yard

NewDogFence

The new dog yard is finished! We plan to eventually build a large deck on this side of the house, so we wanted to choose fencing materials that would be complimentary to a cedar deck design. So, we used tight-knot cedar 4×4 posts, and cedar 2×4 rails.  We did not get these at the “big box” store- these came from a local lumber yard, and the wood is beautiful, nearly flawless, and straight (but was also expensive!). Continue reading “Fancy New Dog Potty Yard”

Goodbye Old Dog Potty Yard

The old dog potty yard, in 2007, with a lot of fallen-down-barn waste and constructiond debris in the background.
The old dog potty yard, in 2007, with a lot of fallen-down-barn wood and construction debris in the background.

In 2006, when the house was being moved and rebuilt, it was necessary to move the dogs from my old house in town out to the farm. I needed to get the old house ready to sell, and not have four Border Collies greet potential buyers at the door! With many things going on and lots of money being spent, I had to make a lot of quick choices on getting things done efficiently and cheaply, rather than well. 😐 The dogs’ potty yard was one of those things. Continue reading “Goodbye Old Dog Potty Yard”

Fence Posts: Wet or Dry Cure Concrete?

DrivewayFenceI’m gearing up to start another round of fencing. I do  add concrete my fence post holes, because in the floodplain, the flotation forces of full-submersion flooding can cause whole fence lines to float- or so I’m told by a neighbor who learned this the hard way! So the question I’m pondering this year is, pour the concrete in the hole dry and let it cure on its own, or pre-mix the concrete first? Continue reading “Fence Posts: Wet or Dry Cure Concrete?”

The Patty Ruzzo Sneaky Dog Long Line

bronteandhershey2First of all, we finally agreed on a name for our Maremma: “Bronte” (spelled without the umlaut- because who wants to spell a dog’s name with an umlaut?). Here is a photo of her with the ram, taken by our neighbor Marla. She and the ram get on pretty well. If she tries to tug at his ears too much and gets on his nerves, he pushes her down and hurts her. So, they have their relationship sorted out! 🙂

You’ll note the long-line she’s wearing. This is a  great secret I learned long ago from Patty Ruzzo in a seminar. Patty is now passed on, but she was a well-known dog trainer who was highly successful in Obedience competition, and I learned many valuable things from her and think of her often.

We all know that puppies usually go through a “keep-away” age, where they start to learn they can run faster than we can, and that being caught is not fun. But, traditional store-bought dog long-lines used for controlling keep-away dogs are heavy and cumbersome. If you are training a dog to jump or herd, regular long-lines can get dangerously tangled on things. So this was Patty’s solution: grosgrain ribbon. This is a special kind of ribbed ribbon you can buy at a fabric store- it is quite strong, and inexpensive. Tie 10 yards of it to a brass clip, and you have a fabulous, lightweight long-line that “floats” along as the dog runs. It’s slippery so it rarely tangles with solid objects. And, if a dog really hits it hard, it breaks, saving their neck from serious injury.

This long-line is so lightweight the dog forgets he is wearing it. And, the best part is that you can step on it when you are calling him, and then just stand their casually like you haven’t done anything at all. He has no idea what has just occurred, and he starts to develop a superstitious belief that you are God-like, and can stop him in his tracks when you call him. Much better than stooping to pick up a heavy long-line, so the dog figures out “oh, if I run fast enough to get that long-line out of your reach, I’m home-free!” Instead, with this long-line, the dog starts to believe that when you call, there is no choice but to come.

So, this is what Bronte is wearing most of the time. She is still at a very silly age, and is easily intimidated by us, so when we are out in the pasture, she bounces around and woofs, trying to initiate the keepaway game, half afraid of being snagged. When she does this, I ingore it, and now and then, step on the long-line, catch her, pet and praise her then let her go.  The long-line is reasonably safe for her to wear in the pasture- there is not much for it to get stuck on. She has broken (or chewed?) it a couple of times, but I just re-tie it while she’s enjoying eating her dinner, and she is rarely the wiser. Her dinner is my best puppet string: she must eat it while I pet her if she wants to eat.

I used a line like this for many months on my “remedial” Border Collie, Gene. Gene was horrible about keepaway, for much of the first year of her life! Especially in a pasture with sheep. And, when Gene is frightened or upset, she flees, unlike most dogs who seek comfort from their owners when scared. I attribute this brilliant and simple invention to me eventually getting Gene under voice control, and now she has very good call-offs when she is working livestock, and will even reluctantly come to me when she is hurt or panicked.

So, I’m hoping, if it worked for Gene, it’ll work for Bronte! So far it seems to be doing the trick! Training an LGD is very different for me, as I only have a few minutes per day of interaction with her, as compared to a competition and house dog that gets many hours of intensive interaction per day. So, I have to make the most of every minute I’m in the pasture, to teach her the things she needs to know!

Gate Hanging Part 2

Here are a few more pictures of my recent gate-hanging lessons. The gates I buy are labled for the gate opening size, if you plan to have the gate fit that opening exactly. But the gate frames are actually about 4″ narrower; this allows room for the hinges on one side, and a little bit of clearance on the other so that the gate can swing freely in both directions. For most of my big gates, I had planned on using interior latches, which require a very specific amount of extra space allowed for  them– I think between 2-2 3/4″, or something like that.

I tried very hard to place the posts exactly right to get the opening within the tolerance allowed. But, I didn’t always succeed, so I had one opening that was a little too narrow. So, the gate only swings in one direction here, and has a latch that can accommodate one-hand operation. This latch also holds the weight of the gate up, to help minimize sagging (upper left photo). And, it accepts a padlock, which I may choose to use since this borders neighboring property.

This gate opening also had the problem of too much slope under the gate. It would have been wiser to have placed this gate further down the fenceline where the ground was level. But doing gates mid-fence instead of along the corners requires H-braces on either side, so costs a lot more in extra posts and work. So, I made do with this corner gate and back-filled some soil at the low point. It can now keep in livestock, but not the dogs (or coyotes)-they scoot underneath. I may need to do some more work with it in the future.

Here is what it looks like now.

 The opposite problem I had was with openings that ended up a little too wide. I just filled in the extra space with treated 2×6″ boards, as needed, so that there aren’t tempting openings for lambs and dogs to try to squeeze through.

Here is one opening that ended up too wide- the gate swings nicely in both directions, but there is a good 4″ of extra clearance I didn’t intend to have!

And, below, is the solution: a “sandwich” of two 2×6’s. I’ve seen people correct even bigger gaps by building a box on the side of the post, so that the full width of a 2×6 can extent out and have another 2×6 capping on top of that, to provide a spot for the latch.

This is another one-hand latch, this one lets the gate go in either direction, and also supports its weight, when closed, to ease sagging. And, this one also accepts a padlock. I’ve installed brass combination locks on the gates by the road, just to discourage any “visitors.” I’m less worried about theft than rowdy teenagers being tempted to do any 4×4’ing in the pasture, or do any “cow tipping.” But, with the combo locks, I can give the combo to anyone who needs to get in, like my friends who want to use the field to train their dogs for tracking. 

Hanging Gates

These pictures have been sitting around for a while, as I finished hanging gates in the first field months ago. But, since I had a hard time developing a strategy for hanging big gates, I thought I’d share what I came up with.

The first time I tried it, I found the gates to be very awkward and unwieldy to handle. Trying to  hold them up to the posts and just mark where they should go does not work! Especially if you are doing it solo and don’t have a helper, which is often the case for me. I needed a more accurate system. Uneven ground increased the challenge: I prefer my gates to be fairly low to the ground so the dogs can’t get under, but they need to be high enough to swing easily, even over time as they sag.

What I found worked well was to use a “string level” to determine where I wanted to position the bottom of the gate. These are inexpensive tiny levels that hang on a piece of string, as shown in the picture.

They aren’t perfectly accurate, but if you position it roughly in the middle of the stretch of string, it’s good enough guidance to let you visualize where the bottom of the gate will be. Once I decided where the bottoms of each gate post went, I marked that on the posts. Then I measured up to where the bottom bracket should be in relation to the bottom of the gate posts, and drilled a hole for that bracket’s hanging bolt. From that bolt, I’d measure upwards to determine the position of the top bracket’s bolt. Here is a picture of the string level marking the gate’s bottom:

The trick with most of these gate hinges is they are intended for the bolt “finials” (this is not the right word, but I’m not sure what the correct term should be…) point towards each other. This is counter-intuitive to some, and if you don’t plan right, you won’t end up being able to achieve this. The biggest reason for them pointing towards each other is: if, for example, a strong cow got her horns hooked in the gate and pulled upwards, you wouldn’t want her to be able to slide the gate right off the bolts. So, having the top “finial” point downwards prevents the gate from being removable in this fashion. (You could imagine that it makes it less trivial for thieves to break in too, but it’s still simple for them to break in: they can just unscrew the hinge bolts, or snip right through your fence wire!)

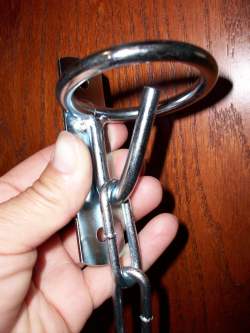
To make sure you can have the top finial pointing downward, it’s important to place the top bolt high enough that you can have the hinge positioned lower on the gate that the bolt’s “finial” and then slide it up onto the “finial”. Err on the side of putting the bolt too high than too low. Once the hinge bracket is on the finial,  you tighten the bolts down, and the weight of the gate is actually pulling mostly sideways against this “finial” (thus it doesn’t need to sit “down” on an upward-pointing “finial”- only the bottom hinge needs to do that). I had a couple of cases where I didn’t plan right, or had another object in the way, and ended up with the top “finial” pointing upwards. It turns out, it works OK as long as the gate is a big one– the weight of the gate still “binds” it plenty on the hinge bolt to where even a lot of force won’t slide it up and off the bolts. But, this would not be true for smaller gates.

Here are two gates where I was pretty happy with their final hanging height and smooth ability to swing in both directions. I had one gate opening that ended up being too narrow, so the gate only opens inward. I can live with that, but much prefer them to go both ways. It just makes it convenient to get vehicles and animals in and out when the gate can move in the direction that’s most accommodating to the flow of movement.

In case my use of the word “finial” isn’t clear, here is a photo of the part of the bolt I’m referring to (in the red circle). In this photo, the hinge and bolt are positioned as they are when you purchase the gate, such that they won’t fall off during transport. You have to swing the hinge around 180°, which can be tricky. I find that I need to bring several extra tools down to the field for this purpose: a big screwdriver for leverage, some channel locks, extra pliers and a hammer. It seems it’s worse on these mesh gates, as sometimes the hinge gets hung up on the wire. On some I had to completely remove it and then re-attach it in the other direction. It takes a lot of force to bend them enough to get them off, and then narrow them back up again to re-bolt them in their final position.

Have Fence, Need Sheep

New view from house.

I have been so busy lately. In trying to take three-day weekends in July and August to get more farm work done, I think it’s just resulted in my working longer hours during my four-day week at work to keep up! On Thursday, I had a 13 hour workday, including driving time! 😛 This morning I had to remote log-in to fix a software build breakage I caused- so much for sleeping in. I am thankful I can do it from home, however, that is sure a convenience.

My plan for the remainder of the weekend is to take Monday off too, and mostly work on the farm. The first field is officially fully fenced and ready for animals- so that’s another task, is finding someone who has sheep to sell! I would prefer to buy eight pregnant Katahdin ewes, but we’ll see what I can find. I am also considering a llama, that would hopefully serve as a guardian.

Other goals for the weekend: weed-whack the septic drain field, mow the middle field, smooth the driveway by the house and order gravel for it. And, prepare for the fair, it starts next Thursday! My mom and I are meeting tomorrow to print out the hundreds of pages of schedules, score sheet labels, armbands, “spirit of 4-H” voting ballots, and state fair entry forms necessary for the operation of our 4-H dog barn at the fair. I am looking forward to eating a Russian Pirozki or two! Yum! 🙂

Magpies, Swedish & One Cayuga

The photo above is the “new” view from the house-minus those scrappy, half-dead alder trees: Kirk cut them down last weekend. And, here is a photo of my purchased ducklings, now three weeks old and thriving. They are enjoying getting let outside in the grass, this is a new privilege this week. The two Swedish ducks have black on the backs of their necks, the solid black one is the Cayuga, and the other four are Magpies.


Fencing Miscellany

I got a few new fencing supplies via mail order today. The first was a one-hander gate latch, a style I’ve admired at several friends’ farms, but could not find locally. It was hard to search for it on the web, as I didn’t really know what to call it. It’s just a simple hook for a chain, but it’s easy to operate with one hand, while being difficult for clever animals to nose open. I imagine it’s only suitable for small, man-sized gates, but those are the ones you most frequently go through with your  hands full, so it’s inconvenient to mess with a chain-around-post lock. I found these at Jeffers Livestock Supply, for $1.99 apiece. Nice!
 
From Kencove, I got a batch of “Wedge-Loc” brackets that allow you to use metal T-posts as diagonal and other kinds of braces. I am interested in using these for a small fenced area I have to create to protect the septic drain field from too much animal traffic and soil compaction. This area is probably only going to be about 60′ on a side, but I do still plan to tension the field fencing there, so I need some kind of corner bracing. Yet, I felt that full H-braces would probably be overkill on something like this. I thought these brackets looked clever, easy to install, and maybe cheaper than using wood, so I’ll give them a try. Though they are sold by many vendors, I couldn’t find a lot of personal testimony on the web to verify how well they work.

Wedge-Loc brackets

 I was interested to see they have an example of using their brackets to make little loafing shelters out of T-posts and a piece of plywood for a sloped roof. This might be convenient for rapidly making inexpensive and moveable weather shelters for small animals or livestock. Hmm, food for thought.