 A week or so after our excavation work was done, we had a break manifest in our septic tite line, near where the new drainage ditch had been dug. They had actually hit the line while they were digging, and repaired it at that point. But, what we didn’t know was that it pulled, like a thread out of a seam, through the soil and broke at a second point up near the tank. Continue reading “Septic Repairs”
Category: Home Repair
Goodbye Old Dog Potty Yard

In 2006, when the house was being moved and rebuilt, it was necessary to move the dogs from my old house in town out to the farm. I needed to get the old house ready to sell, and not have four Border Collies greet potential buyers at the door! With many things going on and lots of money being spent, I had to make a lot of quick choices on getting things done efficiently and cheaply, rather than well. 😐 The dogs’ potty yard was one of those things.  Continue reading “Goodbye Old Dog Potty Yard”
Historic Craftsman Porch Restoration

Our house has a peculiar combination of architectural styles. It was mostly a basic cottage, originally, built around 1929 (1937 tax photo above). But when it was moved to this site, I added a taller second story, which made it look more like a Farmhouse-style house. Yet tacked onto the front of it is a decidedly Craftsman porch overhang, even though there isn’t much else Craftsman about the house. Continue reading “Historic Craftsman Porch Restoration”
New Wood Stove
 Our new wood stove was installed last week, but we can’t use it yet, as it’s missing the heat shield, which is on back-order. Kirk is chomping at the bit to use it, he has a whole stack of barn wood drying under a tarp, just waiting to get in that stove!
Our friends made the hearth, we think it turned out really well. We accidentally chipped the front of it bringing it in, but they will come and repair it. They made it out of a wood structure underneath, covered by cement backerboard, and then their own proprietary mix of cement and some other mystery stuff. They colored it to look like slate, which was our request, to match the black stove.
Deciding on its shape was tricky: as you can see, it comes right up to the trim on the French doors on the right, but then has a longer wall on the left. Our first attempt at the pattern, we drew a circle with the center being the corner of the wall. But we couldn’t make that address the clearance requirements in the front without having it encroach on the doorway and the room too much. Next we tried having the circle’s center abut 12″ out from the corner, but of course, still equidistant from both walls, thinking it needed to be symmetrical.
But, it turned out, it didn’t look symmetrical, even though it was; because the long wall on the left created a visually imbalanced corner. So, we moved the circle center about 6″ to the left. If you study it closely, you can see this, that the circle arcs in more tightly on the right- it is not centered. But, we ended up with the look we wanted- it now seems to be balanced in the corner, oddly enough. Whereas before when it was truly centered, it appeared to be noticeably “off.” It’s funny how the eye can get confused.
We were relieved to get the hearth and see it work there in the corner– it’s always hard to be sure when using a paper template if you really have it right or not, or to envision how that’s going to translate into a real object. We are pleased with the result, the circle joins perfectly to the edge of the door trim. We will change these French doors later to be the style that open outside, instead of in. But, for now, we never use that left-hand door, so there is no risk of it whacking the hearth.
Kirk also sanded and refinishing the floor about a foot out from where the hearth would go. He was figuring, rightly so, that it would be a pain to sand up to that rounded edge later. The type of finish we put down is blend-able; so when we do the rest of the floor later, it should meet up just fine.
Arrowhead Freeze-Free Faucet Frustration
 I have been struggling with a leaky faucet problem for maybe the last two or three months. This is an outdoor hose bib faucet, the kind with a long internal stem. These help prevent problems with freezing weather and broken pipes; as the stem closes off the water supply deep inside the house’s walls where it’s warmer, and the rest of the water drains out of the faucet when you shut it off.
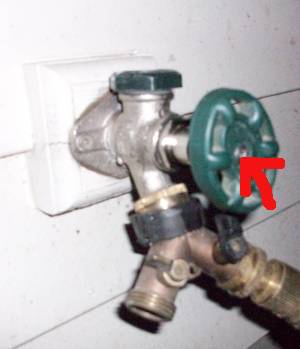
The faucet was leaking where the arrow is pointing in the picture: right out of the tip of the stem, by the handle. This is a key piece of information, but I didn’t realize it at the time. I was annoyed with this whole situation, because the plumbing in this house is nearly brand new, only two years old! I didn’t expect to have plumbing repairs so soon!
I first tried tightening the two connections: the packing nut, and where the stem piece threads into the faucet unit. This didn’t help. Next, I went to the store looking for replacement packing for the packing nut. But, I didn’t realize how many different designs there were, so I ended up coming home with the wrong size. I took the nut back to the store, and got a different packing. When I tried that at home, I realized that the packing nut’s threads were stripped. Back to the store, but they didn’t have that sized packing nut!
So, I tried a different local hardware store. The “plumbing expert” there listened to my description of the problem, took a look at my stem, and at the packing nut, and concluded that my situation was hopeless. I bought a packing nut anyway, since they had one that fit. At home, I cleaned the threads out carefully, and got it to go back together nice and snug. But, the leak was still there.
Next I took it to Home Depot. I actually found a real expert there (this is rare for me), a by-trade plumber. I described my problem to him, too. He shook his head. He did mention a tidbit that would come in handy later, he said, “that there is an Arrowhead brand stem.” But, he also told me that they change the designs on these so frequently, that it’s usually impossible to get replacement parts. He asserted that I’d need to buy an entire new faucet assembly. And cautioned to replace it on a weekday, as people often break their copper pipe when trying to replace these, and then I’d want to call a plumber for backup.
Grumble. By this time, I had probably shut off the water to the house, and taken this thing apart, about a dozen times. I took it back home, put it together again, and sat there and watched the water drip… Then, I started to wonder: why is it coming out of the tip of the stem? And only when the water is turned on. How can that be? Though the stem is hollow (the handle screw threads into the hollow tip), it’s supposed to be sealed. The plug end of the stem is obviously working fine, because when the valve is shut off, no water is getting by.
 I took it apart again. I’m visualizing pressurized water flowing all around this stem on the way out of the faucet. And sure enough, tipping it on one end made water drain out of the inside of the stem. And, then, I see it. A tiny flaw in the solder joint on the stem. Very tiny. But, enough for pressurized water to want to get in there and leak out the other end. It must have taken two years for the water to slowly erode that flaw big enough to create a leak. I tried to solder it closed, but I’m no good at soldering, and I think fixing a tiny hole like that can be difficult, as there is not enough surface for the flux to bind to. It didn’t work. But now at least I knew what the real problem was: something that all three hardware store plumbing experts missed, despite my clearly explaining to all of them that the water was coming out of the tip!
I almost believed the Home Depot guy’s advice that I wouldn’t be able to find a replacement stem. But, I decided to give the Web a chance. And lucky for me that Home Depot guy knew the brand name: thank you Home Depot guy! Lo and behold, McClendons Hardware had the fix, for $12: they carry a whole line of these Arrowhead stems! Wow! I was a little confused about the sizing, when I measured my stem, I concluded that it was a 6″ one. But, when the 6″ replacement arrived by mail, it was too long, so I had to return it. What I actually have, apparently, is a 4″ stem (I’m not sure how they measure these to get those numbers, but ok, whatever). So, last week, I finally got the right sized stem, and replaced it yesterday. And choirs of angels sang: no leak. Thank goodness!