 The front of our house used to have three side-by-side wood-framed windows, as can be seen by this 1937 tax photo I found in the county Assessor records. In the eighties, a prior owner had them replaced with a bay window.
How We Got the Windows We Have Now
 The window was nice from inside the living room, gave a great place to sit and soak in the sunlight. But, when the house was relocated to this site, the county was uncomfortable with the structural integrity of the bay’s design, and wanted extra engineering work done to verify its soundness. There wasn’t time or money for that, so it had to go. I was able to salvage a pair of windows from a very similar house two doors down (along with a lot of other cool stuff), so I put those in the hole left by the bay window. Here is that poor little house, which was later torn down:
They Are Old…
So, what we have now are two double-hung wood-framed windows. And, there they have sat, only half-installed and sketchily hanging in their hole in the wall, for the last three years since the house was moved here! 😀 Other priorities have just caused me/us to ignore them. They need some work, including re-glazing, because the original glazing has mostly fossilized, cracked and fallen off years ago. The window panes are only held in by their metal clips and they rattle in the wind and when trains cross the valley. One time the Border Collies broke one of the panes-shattered it right out onto the ground-while in some crazy barking frenzy about a stray cat in the driveway or something.
But, glazing will come later. My project for this week was to get some insulation around the wood frame, so that we have some reasonable improvement in heat retention in our living room. Before yesterday, the only thing standing between us and the winter air outside were the exterior trim boards; and we could see daylight peeking through in many places. Crazy, I know, but yeah, it’s an old house, and hard to keep up with its ongoing generation of new things to fix.
How The Windows Work
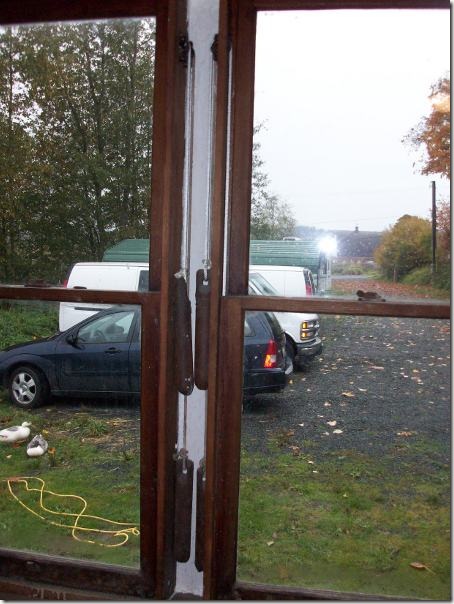
The interior trim boards on our windows are still not installed (they are upstairs, somewhere, in a stack of salvage trim boards, I know…); so it affords a nice opportunity to visualize how old-fashioned windows work, with their counterbalance weights embedded in the wall. And, this also gives me a chance to try to insulate those empty cavities a little, since in the olden days, they had nothing.
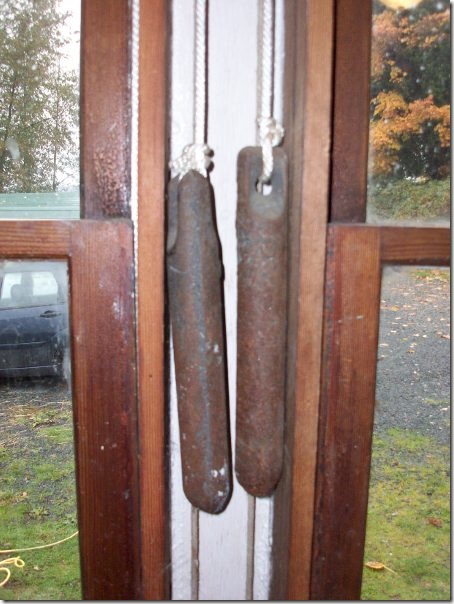
Here you can see that we have double-hung windows, meaning both the upper and lower window panes will move in their vertical channels. Double-hung windows are less common in our region; they offer the possibility of opening the upper window pane downward to let heat escape out of the top of the room in summer. Most windows I have seen in the Northwest are single-hung, meaning only the lower pane slides upward. So, each window has four weights, two on each side for the upper window pane, and two on each side for the lower window pane.
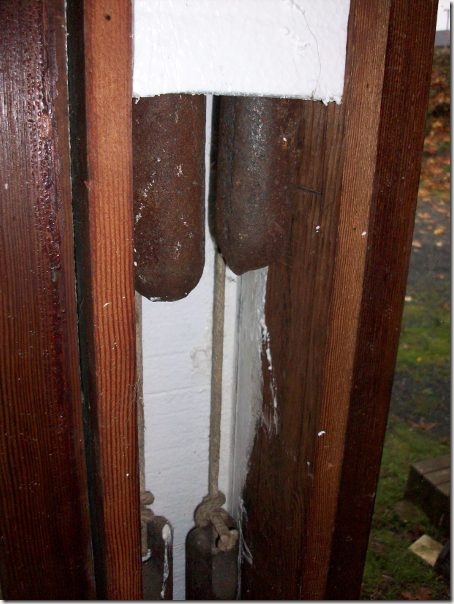
The weights are hung with simple cotton rope with a double knot at the top, which I replaced in the spots I could reach; only because it seemed nice to have fresh-looking and clean rope in the visible parts of the interior of the window. The old ropes looked like they could last another 100 years to me, so replacing them didn’t seem required. Sometimes they get old and stiff from people painting them over many years, then that would probably warrant replacement.
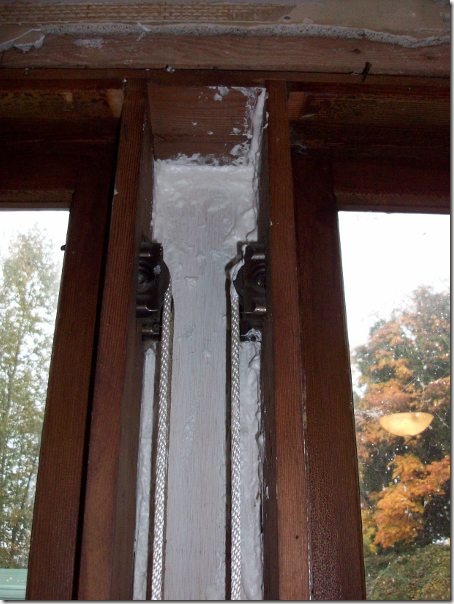
 The ropes travel over pulleys embedded in the window frame:
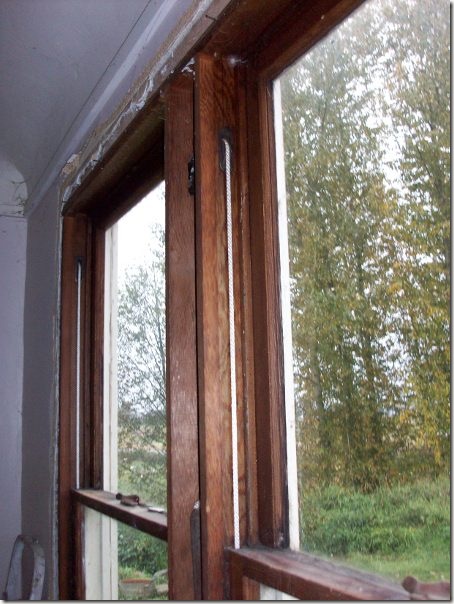
 And run down the travel channel to the window they support:
 They attach to the window pane frame very simply, running down through a groove in its side, and then terminating with a knot that wedges inside a larger hole at the end of the channel (here I’ve been able to pull the window pane frame completely out of the wall to take the picture, because the trim pieces that guide its position have been removed):
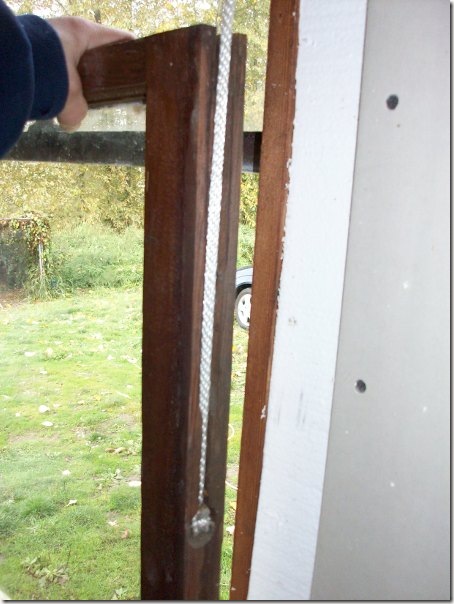 So, the basic idea of these old windows is that as you open up the window, the ropes slide over the pulley and the weight travels down inside the wall cavity. The weights weigh about as much as the window pane, so that when you stop moving it, they counterbalance it, and make the window pane stay in place wherever you’ve positioned it.
I have lived in old houses where somebody cut the rope, letting the weight fall to the bottom of the wall cavity, and rendering the windows imbalanced (you’d have to prop them open with something). I’m not sure why people do this, maybe long after the windows get stuck shut from paint, they just don’t like looking at that dirty old rope, so they chop it off?
If this has happened to your window, and you’re lucky, your window frame may have a little access door, kept closed by a screw, hidden under the moveable window frame part. These doors allow you just enough room to fish around in the window cavity in order to maintenance the weights and their ropes. But, our windows lack such an access door, so it’s useful that I have the trim boards off in this case. I did notice that our window frames seem to have a scribe line where an access door might normally be. So maybe they were manufactured that way, and it was up to the installer to finish cutting them out and making them into a door, if he chose. At least the scribe marks might guide a person in doing this retroactively, if it became necessary to get in there and tearing off the trim seemed repulsive. If they weren’t filled with paint and invisible.
If you look at the first picture again, you can see that the lower window panes have weights that hang fairly high inside the wall, so they have room to travel downward as the window pane is raised. The upper window panes have weights that are hanging down low, because as that pane is lowered from the top, the weights are going to travel upwards inside the cavity. If these were single-hung windows, you’d only see the higher-hung weights, and there would not be a second set of weights down low.
Insulating Them
So, here’s how I chose to insulate the windows. The cavities where the weights travel obviously need to be free of obstruction so the weights don’t get hung up in there. So, it’s not like you can stuff a bunch of fiberglass insulation into the voids.
Instead, I started with the spray-foam-in-a-can stuff, to help seal off the cracks around the edges of all the wall cavities. I like to use the DAP brand latex expanding foam for this kind of thing, because it’s mold-able, and it comes out of the can at 90% of its eventual volume. It’s fairly controllable stuff that fills spaces gradually, so I don’t feel like it’s getting carried away. Some expanding foam products expand so much they can “squeeze” window and door frames as they cure, rending the window or door hard (or impossible) to open (and can even stress-crack window panes, I’ve read). So, of course you have to choose one labeled for this use. The other thing I like about this particular brand and type of foam is that you can wash the little straw and can opening in hot water, and re-use the rest of the contents of the can later (I’ve successfully used it months later). I hate to waste a half-full can of the stuff!
After filling all the crevices with foam, I cut out rigid foam insulation and wedged it both into the back and front of the wall cavities where the weights travel, and also around the top and bottom of the window frame. Here, I’ve finished facing the back of the wall cavity with the foam, and the front side is halfway done, on the top half:
For my windows, the 1/2” thick foam seemed to be the right choice to be sure the weights would not be impeded. I cut the foam such that it wedged into the cavities very tight; both to get as good of an air seal as I could, and also to hopefully prevent the foam pieces from ever shifting and getting in the way of the weights.
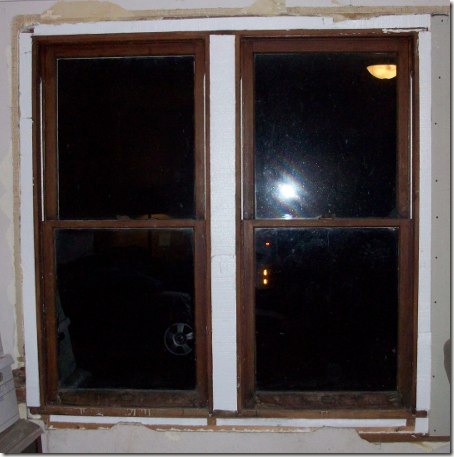
Here is what the finished job looks like, the windows now have insulation all the way around them. Someday, I’ll find all the trim boards and the sill upstairs, and will cover up all the guts of the windows! Then, we can get curtains. Someday! 😉

My parents have windows like this in their house in Kentucky. I think their house was built in the late 30’s, and they bought it in the late 70’s (when I was in high school). We found dozens of window weights in the outbuildings and in the basement, but I’m not sure if they came from the house or from somewhere else (all our windows seemed to work).
I remember we replaced some of the interior wall surfaces with drywall when we moved in, and I’m sure that’s when I saw the innards of these windows. They had cotton ropes too, and as I recall, each window weight had a number stamped into it – presumably the weight.
As I read your entry I thought you might have used a length of PVC pipe to make a channel for the weights, then spray the foam around that. But the problem with that approach would be doing something around the pulleys!
I think someone told me once that people used the weights for some kind of fishing application (net weights? downrigger weights?). Or maybe somebody salvaged them and just thought, hmm, these might be handy for something someday…
I like the PVC channel idea! Maybe you could use a 90 degree elbow, sawed off on one end, to cover the pulleys?
Yeah, a sawn-off elbow might do it. But if you’re happy with what you’ve already done…
Great information, thanks! I have a few windows in my home that needs the weight re-attached, so I am currently looking for that infamous access door! Is it parallel with the window or in front of the window? Thanks again, I was dreading taking off the beautiful 120 year old trim…..
Deb, in ones I have seen that have the access door, it’s in the channel where the window slides. So if you open the window all the way up, it should be in the path of where the window slid. They are low, because with the window open, the weight (if it were still attached to the rope) would be hanging at the bottom of the cavity, and they are trying to give you access to that point. They are usually fairly long, like maybe 4-6″, but very narrow, maybe just an inch or two.
I think the little doors are usually held shut with a small flat-head screw, and I think the whole thing can very easily get covered up with paint. If you have that, maybe using a “stud finder” to try to detect the screw under the paint would help you locate it? If you can’t find a little door, I would imagine it would be do-able to make one, cutting a slot with a small scroll saw, then patching it back up when you are done. Since it’s under the window frame’s path, it would only be visible when the window is open. That might be less of a mess than taking off the front-facing trim. Good luck!