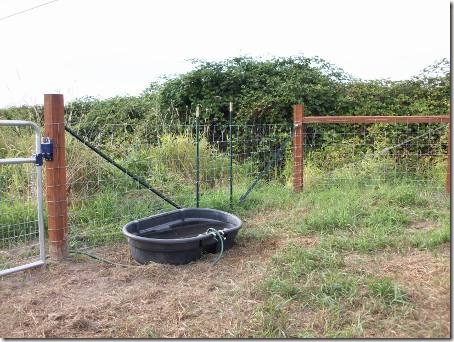
 I bought some Wedge-Loc brackets in the summer of 2008 with the intention of using them to brace short sections of fencing, but only got around to using them this summer. Wedge-Loc’s modest marketing materials would imply that you should never have to build an H-brace again, thanks to their invention; but I think this is probably a bit of an exaggeration. If there is a lot of force on the H-brace, it would easily push a T-post through the soil, much more easily than a 4×4” or 6×6” wood post buried 3+ feet deep. So, these can only be used for small-potatoes applications; like for low-tensile fencing material, very short sections, and places where you least expect an animal to ram into the fence at high speed or push a lot on the fence. But, I think there do exist some scenarios where this type of brace makes sense.
The brackets are expensive enough at my local feed stores (way more than the recommended pricing on Wedge-Loc’s website!), and paired with pricey long T-posts, I don’t think it’s saving me any money over traditionally-sized wood braces. It’s just a faster and easier way to make an H-brace. But, I think they are a little cheaper if you are bracing a section that would otherwise require a very long wood beam.
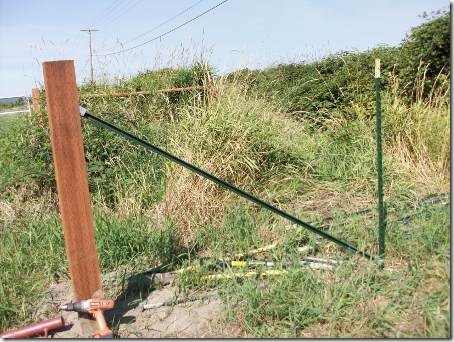
The first application for the Wedge-Loc brace I had this year was that the field’s corners were not square. The field is bounded by meandering drainage ditches, which created rounded corners where I needed to put in a short diagonal section to connect two long, straight lines of fencing. The diagonals were long enough (16-25 feet) that a 4×4” post as a cross-beam would have been expensive, hard to man-handle, and it would have been some work to get the angled ends cut correctly and pinned. And its strength would have probably been overkill for compensating for the tension created by such a small section of fence. Secondly, I had the above-pictured little section to fence off, between a long run and a gate. So I opted for the Wedge-Loc braces in three spots in this field.
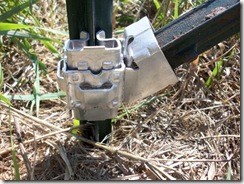
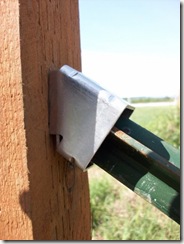
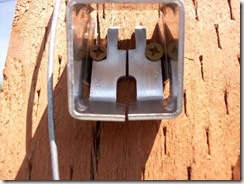
They make these little angle brackets, which can either attach to a T-post using another type of Wedge-Loc bracket, or can be screwed into a wood post. The brackets are the same whether they are facing up or down, creating a sixty- or thirty-degree angle depending on which way they face.
You may recall from high school trigonometry class that this creates the classic 30-60-90 degree right triangle. The Wedge-Loc instruction pamphlet advises “Measure t-post brace length minus 12-16" for distance between posts.” This advice is a little imprecise… 😉 The first ones I did, I went ahead and did the math to determine the actual spacing. On later braces, I eyeballed it, and it didn’t work as well, so I definitely recommend doing the math to get the opposite post positioned ideally, to make the brace nice and firm.
You can easily find a website to help you by searching for a right triangle calculator, if your memory of high school math is a little foggy, like mine is. For these, I used 8’ T-posts for the diagonal, which made them land 4’ high on the vertical wood post, and required that I pound in the mating T-post at a distance of just shy of 7’ from the wood post. And, remember, longer is better on H-brace diagonals.
Before you screw the bracket into the wood post, you need to determine its position based on where the bottom bracket is going to go on the T-post. The Wedge-Loc brackets grab onto one of the “nubs” on the T-post, and that’ll vary on each T-post. So, you have to put that bracket where you want it on the T-post first, then insert the diagonal post, and finally mark where it hits the wood post.
When you slide the diagonal into the brackets, it’s a bit tricky. I found it worked best to put it into the top bracket first, and have the bottom T-post collar/sleeve thing moving freely on the T-post, slide it up to meet the angle component as you insert the diagonal into it, and then insert the “wedge” last.
Once installed, there is a little bit of slop in the whole brace, and you might think it’s not going to be very strong. But I found that once I tensioned the fencing, they did tighten up and got very firm, so they indeed were carrying a load. Now, only the test of time will tell me whether they can handle this load, or whether the T-posts will start to migrate in the dirt, and the end posts will lean, over time. But I didn’t cinch the fence very tight here, so I’m betting they’re going to work fine, and they were certainly easy to install! The only tools needed: fence post driver, hammer, cordless screwdriver, 2 screws, a tape measure, and a pencil. Way easier than the wood H!
Hi, I just read your little review of the Wedge-loc system. I’ve been highly considering this system for a long stretch of goat fence I am having to put up in a rocky area where I *cannot* sink traditional wood posts but t-posts hold fairly well. How, so far, as your system held up? My section of fence is going to be about 129ft long and shouldn’t recieve too much wear and tear with a bunch of electric fence keeping the goats at bay (just some Miniatures, Nigerian Dwarfs, 1 Boer/Nubian, and 2 Pygmys).
Stephanie
Stephanie, so far it’s held up fine! A friend of mine says she uses them a lot and they have worked great for her too. Good luck!
Michelle
I’ve used wedge loc’s for about 3 years now and love them. They work great for electric tape/rope or field fence installs. I’ve also used them to make quick shelters and even hung a gate with one. Highly recommend them, they work great!
Thanks for the comment, Dutch Hollow Acres; so far, so good for me too!
Michelle
We have a couple of miles of farm fence for our horse corrals using Wedge-Loc. How you use the product and in what applications is entirely at the descretion of the user. Our ground holds t-posts well and we did double them up in some areas that the ground was looser sand material. Where you drive your second post depends on how long your brace post is. I never gathered from the packaging or advertising that this product would hold together on its own, rather the tension of your fence reinforces the brace. The best part of this product is that I can reuse the pieces because they never rust. I have moved these pens around and added temprary dividers using additional hardware. All in All this is a great investment and they are always happy to assist you with ideas for your individual situation.
Jason, I wrote this more than two years ago, and thus far, I can say they have stayed put for me in the few places where I used them. That is a good point about them not rusting, a definite boon in our climate where it’s always wet!