I may appear to be obsessed with ducks lately, but I’m not, really! It’s only one small aspect of the farm I wish to grow, but it just happens to be the one going on right now! My third hatchling died a day after the others. <sigh> My guesses of what happened are:
1) the non-medicated poultry grower feed may have been mislabeled; medicated chicken feed can poison ducklings (and boy did their demise look like toxicity). So, as a precaution, I’m going to discard that bag of feed and will revert to just using my adult duck feed (which is really an adequate grower feed as well, at 20% protein).
2) the electrolyte solution I was using may have caused trouble; though I used it on the last batch of ducks with no harm. Many hatcheries and books recommend using electrolytes, but I noticed advice on Privett Hatchery’s website that they recommend against it, especially in the first week. So, I’m going to skip out on that too.
3) The cilantro- I can’t imagine that being a problem, but just in case, I’m going to stick to very plain, and washed, greens.
I really want to build my flock now, I only have one hen left to lay, and I’m reluctant to use the incubator again until I have a way to control the room’s ambient temperature. So I decided purchasing some might be the best move, for the moment. On craigslist, I found a woman who wanted to go in on a hatchery order with some other people (to meet the minimum order size), so I opted to go with that.
Before those arrive, here is a nice photo of one of the last ducks hatching, just coming out of his shell.
Today when I checked on my three baby ducks, two were dead! 🙁 I don’t know what happened, other than that I fed them chopped cilantro as greens yesterday- I wonder if that is somehow toxic to them? I feed it to the big ducks all the time with no trouble, and couldn’t find any indication on the web that it’s toxic. But I did find evidence that people use it for detox measures, so maybe there was some issue there on those little bodies.
Anyway, sad to see such cute babies dead; and the one remaining one seems in distress neurologically as well as from being alone. Singleton babies are never good. I’ve given him some Nux Vomica in hopes that it addresses any toxicity, that’s all I can do! I imagine I could raise animals my whole life and always be saddened to see one perish; but I guess I would never want to see myself lose that compassion for animals either. Every loss is hard.
I’m afraid to try more incubation (though I’m going to have to get back in the saddle sometime and figure out how to do it); and I don’t have enough eggs coming in to make it worthwhile now anyway. So, I’m thinking of ordering a batch; as I really want to increase my flock to around a dozen birds.
I’ve been tempted by Metzer Farms’ “Golden 300 Hybrid” that is specially selected for superior egg production. But… their colors aren’t the best. I must admit, despite all the utilitarian reasons I keep them, I also like them to look nice!
I think I may stick with the Runner and Magpie breeds, though neither have been laying for me as well as the books say. I don’t prefer Khaki Campbells as much (the other good laying breed), I don’t like their color and they are known to be excitable (and my mom’s Khaki mixes certainly are!)
I may mix in some Blue Swedish at some point to improve carcass weight and robustness; but stay generally with the black/blue/silver colors. I’ve resigned to the fact that purebreds aren’t going to work for me, as none of them is designed for all the things I want: eggs, meat, foraging and hardiness for herding (and looks!). 🙂
This weekend I had a couple of disappointments. 🙁 First, of my nine fertile duck eggs in the incubator, only three hatched! Those three hatched on time, successfully, and are robust and healthy. But the other six were more full-term babies that must have perished about three days before the hatch-just before absorbing their yolks.
So, I don’t know what’s going wrong. My only guess is that with the warm summer weather, the temperature fluctuations are just too great inside the incubator. I believe that the heating element controller only has a variable resistor in it, that just determines how much power (or maybe some timing of an on/off cycle) goes to the heating element. What would be better is a thermostatically controlled unit. I’d get it set right one day, then we’d have a hot or a cold day, and I’d notice the temp would be several degrees off in there! But, you would think that momma ducks would have the same problem nesting outside??
So, <sigh> I’m not sure what I’ll do next. It’s about $50+ to mail-order ten ducklings from a hatchery, and I’ve heard that mortality rates are high in those too. So, it may be worth continuing to learn how to do them at home. Or, I could let mother ducks spend several months non-laying to raise their own. We’ll see. For now, I think nine total ducks may be enough. They seem to be staying safe all day while ranging free, despite the overhead raptor presence.
The second disappointment was the fourth side of fencing- it’s finished, but I didn’t stretch one side of it well enough, and it’s sort of puffy and saggy. Not only is it unattractive, I don’t think it’s as strong that way. I think I can fix it later by cutting it down the middle and tensioning each side back towards the middle, and then crimping the ends together. But, I’m going to put that off and live with it as-is for now.
But, the weekend was still good. I got a lot done, I have three cute baby ducks at least. We got a chance to go check out the local town’s festival and antique car show for a few hours today, and also had a great dinner out on Friday night. And, I am working on some interesting projects at work right now, so I don’t even mind that tomorrow is Monday! 😉
I posted a bunch of half-done blogs today, as my computer is fixed again! Hallelujah! The HP help dude in India was wrong, I didn’t need a new hard drive, just a working CD drive to read the Windows boot disk to repair one of the windows boot files. But, I had bought a new hard drive just in case, so now I have to see if I can return it!
I bought new RAM while I was at it, can’t wait to experience the improved speed, as the box was feeling pretty sluggish lately compared to what I have at work!
I still have some fixing left to do: my wireless printer connection got blown away during the repair, and the new CD drive, though it worked well when the computer was half-defunct, it’s misbehaving now that Windows is fully up, so I have to fix that too. But, I’m glad to have my ‘puter back, I’ve been waiting a whole week to balance my checkbook in Quicken! :-0
This is Chessie, he’s 15 years old. I got him when I was in college; he was a dog pound rescue, a ~4 month old, shy neurotic pup with a lot of instinct to chase things. Back then I couldn’t see much beyond school, and never really expected him to be anything but a companion. But, I trained him, and after graduating, finally had enough money to compete with him. He earned a lot of titles in obedience, agility and even a “PT” in herding (though his desire to “grip” and run livestock limited his further progress there).
He has been a good friend all these years, weathered my many training mistakes, me losing my temper and patience with him many times, and some irresponsible things I did with him when I was twenty-something (like tying him outside my Calculus class one afternoon, which resulted in him escaping and running around, un-capturable, menacing everyone in terror until the police were summoned :-0). We have been through a lot of life together, many houses, roommates, growing up, boyfriends and dog show travels.
But now he is in the twilight of his life. Though still healthy in many ways, his kidneys are on the way to failure. And, his rear end has become neurologically crippled so that walking is very complicated, though not painful. And, he is mostly deaf and senile. And so it goes, I assume that someday soon, I’ll either wake up to see that he has passed away, or I’ll have to choose to put him down.
There lies the rub for me. All my dog show friends reassure me, “you’ll know when it’s time.” But, that doesn’t seem to hold true for me. I lost an elderly cat to cancer a few years ago, and I completely didn’t know whether or not to euthanize. His death seemed imminent day after day, where I figured he only had hours left, so there was no sense in putting him down. But, he’d make it through that day, and the next, and the next. Each day, I’d think, “man, maybe I should have done it yesterday, but it looks like today will be his last.” In the end, I wished I’d done it much earlier; I’m not sure if to save him, or myself, or both, from the trials of the dying process.
One friend offered this suggestion: pick five things that they love, and when they can’t do three of them, then it’s time. Well, hmm, for an old dog, there isn’t much: Chessie stopped wanting to train new material a year or so ago, but he still enjoyed doing easy material he already knew. Several months ago, he stopped wanting to ride in the van though, so opted-out on going to training nights. He used to like to go for a run in the field, but in the last couple of weeks, he’s been opting out on that too. He still does like to eat, and be petted. So, I guess that’s two out of four-where does that leave me?
Chessie eating duck feed
I can’t help but notice the parallels to my two ninety-something grandmas. They too have cut back on most of the things they used to enjoy. One sleeps a lot, and watches TV the rest of the time. The other is frustrated by her fading memory and reasoning ability. I recently met a lovely 90 year old lady, who said, not in a complaining tone, but in a contemplative manner, “I never planned on or expected to live this long, and I kind of wish I hadn’t. Just too many things going wrong with my body.” In old age, there is pain, loss of eyesight and hearing, and the unglamorous things- bladder and bowel control isn’t what it used to be, and it’s challenging to maintain one’s desired level of hygiene. And, dementia can cause people to say things that are not always real “Emily Post,” if you know what I mean, Gentle Reader. 🙂
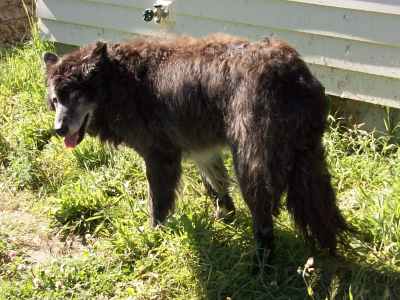
Chessie, too, has lost his social graces- he used to get along well with other dogs and was well behaved with people. Now, he takes food from the other dogs in a demanding manner, growls at everybody to get out of his way, he’s grumpy, and if he falls and I try to help him up, sometimes he bites! Hard! Here is a photo of him having snuck into the duck pen, he’s porking out on duck feed like Winnie The Pooh caught in the honey! His appetite is one thing that remains robust!
I suppose it’s good that we have, with animals, the option of euthanasia; to prevent them from needless suffering at the very end. But, it’s a heavy burden both to cope with the living part of end-of-life care, as well as be the one who has to decide when euthanasia is the appropriate choice. One part of me is anxious for this phase of life to be over, another part dreads that happening. I guess you just take it day by day, and hope you make the right decisions.
I mentioned before I was wondering about the color genetics of my now two-month-old “baby” ducks. I re-read the color section in Holderread’s book (Storey’s Guide to Raising Ducks), and now I think I understand. So, I crossed a black Runner hen with a silver Magpie drake. Black x Silver always results in 100% blue offspring. So, these guys are technically “blue” ducks, and this cross will always give me this pattern.
The genetics of the black, blue, silver color crosses are as follows:
Blue x blue = 25% black, 50% blue, 25% silver
Blue x black = 50% black, 50% blue
Blue x silver = 50% blue, 50% silver
Black x Silver = 100% blue
He doesn’t say what Silver x Silver produces, but I’m guessing 50% blue, 50% silver?
So, as subsequent generations of these blues mix with each other, or mix with the two Silver drakes I have now, I’m going to get all three colors in the future!
I wondered about their tiny black spots. The book explains that in the blue coloring (which is a dilute of black) typically some black “leaks through.” Of course, all will always have some pattern of white, since both the Magpies and Runners carry that gene.
Magpie Drakes
Here are my Magpie drakes, father and son. The son is very pretty, and I understand good markings are hard to get on Magpies. I said I’d never show my ducks, but I may change my mind about him! If only I can find out how you get them clean for the show table! I need some advice there.
I’m pleased with the crossbreeds; I wasn’t sure I was going to want crossbreeds at first. But I’m beginning to reflect that pure Runners are too delicate for dog work; and the Magpies are too heavy and slow. The cross makes an agile duck that’s still robust enough to resist injury. I’m also having better luck with the viability of the eggs-both times, I’ve had more crossbred eggs survive than the purebred Magpie eggs. Hybrid vigor?
Here is an update on my ducks. First, the bad news. My black Runner duck hen died. 🙁 I was trying to separate them into different pens before dark, she split off on her own, got scared and hid in the blackberry vines. When it gets dark, they won’t come out and put themselves away in their pens like they do before dusk.
I feared that if I left her all night something would get her, so I risked using the dogs to help me find her. Well, Maggie found her, and bit her quick in the neck, and she died instantly. So, lesson learned, letting the dogs hunt for singleton ducks in the dark is a bad idea (it worked once before though!). I’m sad to lose her, she was a nice looking duck and a good layer. So, of my last summer’s investment in purebed show ducks, both Runners are gone, but both Magpies have persisted.
The good news is that I have nine fertile eggs in the incubator due today-2 Magpies and 7 half-breeds. Two have already hatched, and I’m hoping the rest will come through OK. The first two seemed to have a much easier time than the last batch, so I think my improved setup and extra humidity is helping.
Here is the broken-open egg of duck #1, you can see he made a textbook exit, and a day early to boot. The next photo shows him newly hatched and tired, all flopped out on the bottom of the incubator.
This first little guy was lonely last night, it’s amazing how strong their instinct is to want to be with a group, or somebody. In desperation, he was jumping at the sides of the hatching pen to get closer to me! He kept issuing distress calls, and I worried about him experiencing that much stress all night, since his next of kin wouldn’t be arriving until the next day. So, I gave him a little stuffed animal, and that worked, he snuggled up to it and relaxed.
Here is my new hatcher setup. Last time, I used a wire dog crate, with cardboard lining the interior walls. That worked well, except that the small tray at the bottom couldn’t handle the water load of them spilling so much, and it eventually leaked on the floor (that was a mess!). So, I’ve changed to a livestock water trough with chicken wire on the top (and this is shut in a bedroom where dogs and cats can’t go!).
Here are a few more incubation details. Though I’ve now added an electric egg turner to the device, you take it out the last three days, to allow the chicks to orient themselves for hatching. So, here is what the incubator looks like with the screen floor back in, and lots of sponge pieces to evaporate and add extra humidity. I’ve also been misting the eggs daily with water.
And, here are a couple of pictures of egg candling. I found that I don’t need a fancy device, just a strong flashlight, and cupping my hand in a “C” shape between the light and the egg does the trick. First, an infertile egg: you can see the yellow yolk in there, and no blood vessels at all– this one never started growing.
This next photo shows a fertile egg on day 26- the egg is completely dark, full of duckling, except for the air pocket at the top, which has grown quite large.
This time, I wrote (in pencil) on the eggs their laying date, so I could keep track of the viability of older eggs (some were kept two weeks in my pantry before incubating). That is working well, except I see now I should write on the end of the egg opposite to the air cell, because when they crack out, they are obscuring my writing!
This time too, when I set them for their last three days, I marked all the “tops” of the eggs with an “X.” I’ve found that when the first few start to hatch, they thrash around in there and roll the other eggs around. I suspect flipping some of them a day before they hatch may mess them up, so this time, I’m trying to put them back right-side-up if I notice they’ve been disturbed.
Notice: Undefined index: file in /home/ja55j8r8hao2/public_html/wordpress/wp-includes/media.php on line 1675
I am taking vacation every Friday in July and August. I got a lot done this weekend, three whole days really help get regular chores done, plus extra things I want to do. I finished the fourth side of fence posts for the pasture, hooray! I have to put the cross-beams on four H-braces, and then it’s ready to stretch. After that, it needs four gates hung and it’ll be ready for livestock!
There are more things to be done in this pasture: it needs another line of fencing to segregate it from the lane. It needs the septic drain field fenced, to keep animals off that area, except for flash-grazing. And, it needs a permanent water supply. For now, I’m going to make do stretching a long hose from the house, and hauling water during freezing weather. But, my goal is to get it under graze as soon as possible, to put that grass to good use, and cut down on the amount of mowing needed. And, have something on which to train dogs!
I picked up some concrete at the local farm co-op store down the road today. I really enjoy that store; the man helping me load my stuff has been keeping track of my progress. He offered much encouragement today. We have a new Home Depot nearby, and I do appreciate the good prices and wide selection of such a big store. But, the employees there would never remember my name or what I’m working on, that’s for sure!
Here’s a cool feature on my new camera: a “stitch” function that’s right on the camera! In this setting, I can take one shot, then it’ll crunch for a moment, present me with the edge of that shot, to which I line up the next one, roughly. Then, it’ll stitch three shots together. Here’s a test, just a view of the pasture from the yard:
Panoramic View of pasture.
Boy, it’s never more obvious than in a photo that that center cluster of suffering alder trees really needs to go!
I am having some electronic troubles. First, my camera died- it just froze, with the lens open, completely unresponsive, despite a freshly charged new-ish battery. I think I paid over $400 for it years ago when something like 3.2 mega pixels was amazing technology-maybe 8 years ago? It is huge compared to modern cameras, a real handful; and the keys and lens cover had become sticky, from something. Look at this old clunker, on its tacky plastic desk-hogging dock:
So, I’m not lamenting its demise too much. I replaced it with a very slick, tiny, bronze-colored Kodak EasyShare (the old one was an EasyShare too) for only $130-wow, how prices come down on new technology! So, I’m back in business for taking pictures.
My laptop also failed- I have a Compaq Presario R3240, and it has been such a lemon for me. Twice I have had the motherboard replaced-one on HP’s dime and once on mine. Now, it appears the hard drive and CD drive failed together. So I can’t attempt ard drive repair using the boot CD because the CD drive is dead. I logged onto the HP “chat” help. It’s obviously a help center in India, judging by the “accent” of the helper, and he was obviously dealing with multiple customers at once, because he kept getting my conversation confused with someone else’s. So, he wasn’t much help, after telling him the hard drive BIOS test failed, he was sure the drive is just dead and needs replacing. I wonder if I’ll find that to be true if I can manage to fix the CD drive first, to get the boot CD in?
I spent $300 on parts for it (bought more RAM while I was at it), due to arrive Wednesday. It’s getting to be long in the tooth-maybe 5 years old. But I hate throwing away electronics, it seems so wasteful to replace them every few years. And it’s serving me fine (when it’s working) since I mostly just check email, surf the web, and run Quicken, GIMP, and FrontPage on it. So, I’ll give it one more repair job, which will probably take me several hours of messing around. <sigh> In the meantime, I’ll make do using other computers, like my work laptop, for which I’m grateful during times when I am doing repair on my home laptop!